Canton Network Overview
High-level Overview
Canton Network is a public layer 1 blockchain network with privacy. It is designed for financial institutions and DeFi alike to facilitate secure, interoperable, and privacy-preserving transactions and drive the confluence of TradFi and DeFi. Key Features:- It uniquely balances the decentralization of public blockchains with the privacy and controls required for financial markets.
- It enables real-time, secure synchronization and settlement across multiple asset classes on a shared, interoperable infrastructure.
- It allows assets and data to move across applications with real-time synchronization and guaranteed privacy.
Canton’s High-level architecture
Nodes and Consensus
The Canton network is composed of nodes known as validators that achieve consensus through synchronizers. Validator nodes are responsible for storing contract data and executing smart contract code. The synchronizers, in turn, distribute encrypted messages and facilitate transaction coordination. Transaction data is only distributed on a need-to-know basis to maintain confidentiality. This is the key delta to other chains:- In most other chains, all state and transactions get replicated to all nodes/validators.
- In Canton, state and transactions get distributed only to nodes/validators that are specified in the smart contracts.
Parties
In Canton, parties are the core on-ledger identities, and are the wallet addresses, similar to an address or Externally Owned Account (EOA) on other blockchains. They are central to how permissions and privacy are managed within the network. Party Permissions and Roles Smart contracts specify permissions for different parties, dictating what they can and can’t do. Depending on their role, parties:- Validate specific transactions, such as a transfer of assets.
- Control certain actions, like initiating transfers.
- See specific state and transactions, such as a record of their holdings.
name::fingerprint. The party name or hint is freely chosen at time of creation - there’s a maximum limit of 185 characters from [a-zA-Z0-9:-_ ], it must not use two consecutive colons, and must be unique in the namespace. The fingerprint is a unique identifier and a sha256 hash of the public key prefixed with ‘12’ (as indicated by the hash purpose).
If you want to be able to derive your Party IDs from the public key, you can either use a static Party Name, and therefore derive the key from the fingerprint, or derive Party Name from the public key, too.
To use a party, you must onboard it by submitting a topology transaction that authorizes a node to host it. The designated node must then submit a matching transaction to officially accept the hosting request. Instructions on how to do that can be found here.
Party Hosting
Since not every user wants to host a node, parties are associated with validator nodes. These validators “host” parties by: * Storing the party’s private data and making it available through an RPC (Remote Procedure Call) interface. * Participating in consensus on the party’s behalf.
Crucially, even though a validator hosts a party, the party retains ultimate control by holding its own independent signing keys externally to the participant.
To participate in the network, a party must designate one or more validator nodes to host their data. This relationship, known as Party Hosting, is established through a topology transaction.
Advice on using Parties for wallet providers
Unlike Ethereum or Bitcoin addresses, creating parties has a cost associated to them and they create state on the validator node which means that they’re not as ephemeral as on other chains. Therefore, it’s suggested to avoid using parties for use cases such as “deposit addresses”.
- For wallets, it’s suggested to aim for one Party per key pair to represent the wallet.
- For custodians, it’s suggested aiming for one Party per account/wallet.
- For exchanges, it’s suggested aiming for one, or few parties for the exchange vault and using memo tags for tracking deposits. See here for more information.
Consequences & Implications
Reading Data and Validator State A key implication of Canton’s architecture for providing privacy, is how you read data. Unlike other blockchains where nodes are often ephemeral and interchangeable, in Canton, validators have state. This means that to access a party’s or user’s data, you must specifically connect to the validator that hosts that party. There is no single, all-encompassing blockchain RPC endpoint you can call to retrieve all data. Instead, you’ll need to use your node’s RPC for private data (“Ledger API”) and potentially an app provider’s API for their data (e.g., a “Scan API”). Advantages and Consequences The design of the Canton Network leads to several significant advantages:- Privacy: It enables true confidentiality at the smart contract level, as data is only distributed to the parties who have a legitimate need to see it.
- Light Node Footprint: Nodes only process their own transactions, not the entire network’s, which keeps them lightweight and efficient.
- Scalability: The network can be scaled by simply adding more nodes.
Implications for Wallet Providers
To offer services on the Canton Network, you will need a validator node to host your parties and your customers’ parties. You have two options for this: you can self-host a node or use a node-as-a-service provider.
For wallets and custodians, this means your role extends beyond just safekeeping assets; you are also responsible for safekeeping your customers’ data and preserving their privacy.
The Canton Network is designed to be agile and undergoes frequent upgrades. Node operators are asked to run nodes in three different environments: DevNet, TestNet, and MainNet to ensure that applications and integrations can be tested with new network upgrades. If you choose to self-host, be prepared to spin up and maintain nodes for all three environments. To stay informed and get support, it’s highly recommended that self-hosting node operators join the validator node operator community on Slack.
Integrating with the Canton Network
When integrating with the Canton Network, we recommend that wallet providers support the necessary features outlined below to optimal user experience. Additionally, there are optional features that can further enhance the integration and provide additional value to users.Necessary Features
The following features are required for wallet providers to integrate with the Canton Network:- Support the CIP-0056 token standard to enable the holding and transferring of assets on the Canton Network. Documentation and guidance on how to implement this with the Wallet SDK is in the Token Standard section of this guide.
- Provide support specifically for Canton Coin and USDCx. The Canton Coin package of Amulet is preinstalled with all validators and USDCx is issued with the Digital Asset Registry and that dars for that application can be found in the DAR Package Versions of the Utilities documentation.
- Memo tag support to allow deposits to be sent to exchanges
- UTXO management to reduce the number of UTXOs
Optional Features
While optional for wallet providers, the following features are strongly recommended to ensure full support for the Canton Network and maximize user adoption:- Canton Coin pre-approvals. Documentation on how to implement pre-approvals with the Wallet SDK are in the 2-step transfer vs 1-step transfer section of this guide.
- dApp support by conforming to CIP-0103, the standard for wallet and dApp integration.
- The requirement to hold and transfer USDCx is included in the Necessary Features section above, however there are additional levels of support for USDCx for wallet providers to support such as supporting xReserves deposits and withdrawals and integrating the xReserve UI into the wallet directly. The options and instructions are laid out in the USDCx Support for Wallets section of this guide.
- Pre-approvals for DA Registry issued assets.
How to install the Wallet SDK
The Wallet SDK is available as a package on the NPM registry. You can install it using your preferred package manager.- npm
- yarn
- pnpm
- npm
- yarn
- pnpm
Hosting a Validator
As stated in the Implications for Wallet Providers section here, it’s important for wallet providers to have a validator to host their users’ parties. It’s also strongly advised to operate a node in all three network environments so that you can test and verify your applications and integration as the Canton Network evolves. Links to the node deployment docs are below depending on the deployment choice and environment. The guidance differs very little based on the environment - different URLs and arguments etc.: The Wallet integration guide is tailored to work with a LocalNet setup (/sdks-tools/development-tools/localnet) to make testing and verification easy.Connecting to a Synchronizer
For onboarding a validator with the global synchronizer it is recommended to read the Splice documentation here: /global-synchronizer/deployment/onboarding-processSupporting Tokens and Applications
To integrate and support tokens, it is recommended to use the Splice documentation here: /global-synchronizer/deployment/onboarding-process If you are interested in building your own application, a good first place would be to utilize the CN quickstart: https://github.com/digital-asset/cn-quickstartCreate an External Party (Wallet)
Overview
Parties represent acting entities in the network and all transaction happens between one or more parties. To understand more about parties see the Parties in the Overview. A detailed tutorial of the steps below can be seen in the External Signing Tutorial here using python example scripts. This document focuses on the steps required to create an external party using the Wallet SDK.How do I quickly allocate a party?
Using the wallet SDK you can quickly allocate a party using the following code snippet:- Quick using Splice LocalNet
- Comprehensive using Splice LocalNet
Create a key pair
The process for creating a key using standard encryption practices is similar that in other blockchains. The full details of supported cryptographic algorithms can be found Here. By default an Ed25519 encryption is used. There exists many libraries that can be used to generate such a key pair, you can do it simply with the WalletSDK using:Generating Keys from a Mnemonic Phrase (BIP-0039)
The Canton Network supports the generation of cryptographic keys using a mnemonic code or mnemonic sentence, following the BIP-0039 standard. Using a mnemonic phrase allows for deterministic key generation, which simplifies the backup and recovery process. Instead of managing individual private key files, you can recreate your keys across different environments using a human-readable sequence of words. A typescript example of generating an Ed25519 key pair with a BIP-0039 mnemonic phrase using the libraries bip39 and ed25519 as dependencies is shown below:Choosing a party hint
The unique party id is defined as $::$. The partyHint is a user friendly name and can be anything that is unique for the fingerprint, e.g. “alice”, “bob” or “my-wallet-1”. It is recommended to include a hint when setting up the party (seequick-party-allocation for an example).
Generate the fingerprint
The wallet SDK has a built in function to generate the fingerprint:Generating the topology transactions
When onboarding using external signing, multiple topology transactions are required to be generated and signed. This is because both the keyHolder (the party) and the node (the validator) need to agree on the hosting relationship. The three transactions that needs to be generated are:- `PartyToParticipant`: This transaction indicates that the party agrees to be hosted by the participant (validator).
- `ParticipantToParty`: This transaction indicates that the participant (validator) agrees to host the party.
- `KeyToParty`: This transaction indicates that the key (public key) is associated with the party.
Decoding the topology transactions
Sometimes converting the topology transactions to human readable json might be needed, for this you can use the.decode() function:
Sign multi-hash
Since the topology transactions need to be submitted together the combined hash needs to be signed. The wallet SDK has a helper function to sign the combined hash:Submit the topology transactions
Once the signature is generated, the topology transactions can be submitted to the validator. The wallet SDK has a helper function to submit the transactions:Multi-hosting a party
Since only relevant data is shared between validator nodes, and nodes don’t contain all data, backup and recovery are important. Another important aspect is to prevent having a validator being a single source of failure, this can be handled on a party basis by doing multi hosting. Multi hosting of a party means replication of all the information related to that party onto multiple validators, this can either be multiple validators run by the same entity (most common case for wallets) or even validators run by different entities in case of malicious actors. To facilitate multi-hosting we simply need to extendpartyToParticipant and ParticipantToParty to include new validators. This requires sourcing signed transaction from the validators the client is interested in being hosted on.
The below script allows you (by using the SDK) to host a single party on both app-user and app-provider validators.
Finding and Reading Data
The wallet SDK primarily focus on an on-party basis interaction, therefore it is almost always required to define the party you are using fo each command/Reading Available Parties
Reading all available parties to you can easily be done using the wallet SDK as shown in the example below, and the result is paginated. It’s worth noting that the call to read all available parties doesn’t use the the party and synchronizer fields therefore changing them has no effect on the result.Reading Ledger End
A lot of different requests will take a ledger offset to ensure the requested time correlates with ledger time. A Validator does not have a block height since there is no total state replication. There are two values that correlate:- ledger time - this is the time the ledger chooses when computing a transaction prior to commit.
- record time - this is the time assigned by the sequencer when registering the confirmation request.
Reading Active Contracts
Using the above ledger time we can figure out what the current state of all active contracts are. Contracts can be in two states - active and archived - which correlates to the UTXO mode of unspent and spent. Active contracts are contracts that are unspent and thereby can be used in new transactions or to exercise choices.Visualizing a Transaction
The Wallet SDK uses a transaction parsing transform a fully fledged transaction tree into human recognizable transaction view. The full code for the transaction parsing can be found at parser typescript class. The Wallet SDK uses this parser to transform all transaction tree interacted with into PrettyTransactions. for instance on thegetTransactionById or listHoldingTransactions (Detailed here).
The Transactions will have format:
- Tap operation
- Merge Split
- Transfer Out
- Transfer In
Here is an example on how a “tap” event looks like (Performing tap):The tap gives a nice and simple view some key values to look at. Using the For a “tap” event we don’t have any locked holding changes, however we do have an unlocked create event:
label we can quickly gage what is happening:Preparing and Signing Transactions Using External Party
High-level Signing Process
The basic steps of preparing and signing a transaction using an external party are as follows:- Creating a command - You start by simply creating a command.
- Preparing the transaction - You send the command to the blockchain RPC, offered by your node, to prepare the transaction.
- Validating the transaction - You inspect the transaction and decide whether to sign it.
- Signing the transaction - Once validated, you sign the transaction hash using your private key (typically with ECDSA/EdDSA).
- Submitting the transaction - You submit the signed transaction to be executed.
- Observing the transaction - You observe the blockchain until the transaction is committed.
How do I quickly execute a Ping?
Below shows how to quickly execute a ping command against yourself on a running Splice LocalNet:Creating a Command
Commands are the intents of an user on the validator, there are two kinds of commands:CreateCommand and ExerciseCommand.
The CreateCommand is used to create a new implementation of a template with the given arguments and can result in one or more new contracts being created. The ExerciseCommand takes an existing contract and exercises a choice on it, which also can result in new contracts being created.
In the Canton Network, it is often necessary to need to include input data when creating commands which needs to be read from the ledger. For example, which UTXOs to include in a transfer. This is private data which you read from your own node. It’s also often necessary to include contextual information in a transfer. For example, information about a particular asset which you don’t get from your own node - you get from an API provided by the asset issuer. See here for more information.
The general process for forming a transaction is:
- Call your own node’s RPC to get the current ledger end (think “latest block”)
- Call your own node’s RPC to get relevant private data at ledger end (e.g. wallet’s holdings)
- Call app/token specific APIs to get context information (e.g. mining round contracts)
- Assemble the data into the full command using the OpenAPI/JSON or gRPC schemas.
accept or reject on the created contract (thereby archiving it). In the cURL example, we show the steps above gaining information from a validator and context information from the Canton Coin scan API.
The Wallet SDK allow us to build such a command easily:
- SDK
- cURL
Preparing the Transaction
Now that we have a command we need to prepare the transaction by calling a node’s RPC API which will return an unsigned transaction. It must be a validator which hosts the party initiating the transaction as private information is needed to construct the transaction. This is unlike other chains where you construct the transaction fully offline using an SDK. A transaction is a collection of commands that are atomic, meaning that either all commands succeed or none of them do. Note: contractId’s are pinned as part of prepare step, the execution of the transfer will only go succeed if the contractId’s haven’t been archived between preparation and execution steps. To prepare a transaction we need to send the commands to the ledger.- SDK
- cURL
Validating the Transaction
The result from the prepare step is an encoded protobuf message and easily decoded and inspected to go through a policy engine, for example. The transaction is returned alongside with the hash that needs to be signed. If the validator is not controlled by you, then it might be a good idea to validate that the transaction is what you expect it to be. You can use the Wallet SDK to visualize the transaction as described in the Visualizing a transaction section. On top of visualizing the transaction, it’s also important to compute the transaction hash yourself and confirm that it matches the hash of the transaction provided by the validator from the prepare step. The hash can be computed using the Wallet SDK:hash with the transaction.preparedTransactionHash to ensure they match.
Signing the Transaction
Once the transaction is validated, the hash retrieved from the prepare step can be signed using the private key of the party. Below shows an example in the Wallet SDK and using cURL commands:- SDK
- cURL
Submitting the Transaction
Once the transaction is signed, it can be executed on the validator. You can observe completions by seeing the committed transactions. If they don’t appear on your ledger, you are guaranteed some response, and you can keep retrying; signed transactions are idempotent. Finality usually takes 3-10s.- SDK
- cURL
Observing the Transaction
Theexecute method in the ledger`` namespace will execute the submission and wait for a response. THs returns an \updateIdandcompletionOffset`. Additionally, you can continuously monitor holdings changes using token standard history parser.
How to use the SDK to Offline sign a Transaction
The SDK exposes functionality that can be used in an offline environment to sign and validate transactions the below script shows an entire interaction betweenAlice and Bob with signing happening in an offline environment and online environment that performs the prepare and submit.
Signing Transactions from third party dApps
A normal flow on blockchain applications is to have dApps that interact with the blockchain on the clients behalf, these flows usually require the user to sign transactions that the dApp prepares and submit it. To faciliate this in Canton it is required that the prepared transaction is sent to the wallet for signing. An easy way of supporting this is to expose a dApp API (OpenRPC spec can be found here: https://github.com/canton-network/wallet/blob/main/api-specs/openrpc-dapp-api.json ). The specs are in OpenRPC to conform with traditional standards like for ethereum. A client can provide access to a Wallet Providers dApp API by either embedding a wallet provider in the dApp or by connecting to an external wallet provider via a browser extension or other means. Then the dApp is able to funnel transactions through to the wallet provider for signing.Receiving a Transaction
A dApp would usually call theprepareExecute endpoint or the prepareExecuteAndWait endpoint. In both cases the Wallet Provider would prepare, sign and submit the transaction to the ledger.
You can prepare the incoming transaction using the Wallet SDK:
Reading and Visualising the Transaction
It is important when integrating with third party dApps to showcase the User exactly what is being signed. Once the signature is applied the transaction can be considered valid (and executed). The easiest would be to create a visualizer that takes a JSON representation of the transaction. The Json for a prepared transaction (before signature is applied) can be obtained using the Wallet SDK:Token Standard
The Wallet SDK support performing basic token standard operations, these are exposed through thesdk.tokenStandard a complete overview of the underlying integration can be found here and the CIP is defined here.
How do i quickly perform a transfer between two parties?
The below performs a 2-step transfer between Alice and Bob and expose their holdings:- Creating a transfer
- Accepting a transfer
- Rejecting a transfer
- Withdrawing a transfer
Listing holdings (UTXO’s)
Canton uses created and archived events to determine the state of the ledger. This correlates to how UTXO’s are handled on other blockchains like Bitcoin. This means that at any point in time you can retrieve all your active contracts with the interface ‘Holding’ to see all assets you posses across different instruments.Listing holding transactions
In order to stream transaction events as they happen on ledger thelistHoldingTransactions endpoint can be used. This takes two ledger offset and gives an overview of all token standard transactions that have happened between. It also returns a nextOffset that can be used when calling the endpoint again. This will allow you to easily ensure you do not receive any transaction twice and you are only querying the transactions that have happened after.
Performing a Tap on DevNet or LocalNet
When writing scripts and setup it is important to have funds present, this can be very tedious on blockchains. Therefor most blockchains support some form of a faucet (that allows to receive a small amount of funds to play with). On canton we allow thetap method that is only present on DevNet (or LocalNet), by using this you can stock funds to easily attempt some of the CC transfer flows:
Creating a transfer
In order to create a simple transfer you can use thecreateTransfer on the token standard. Then like any other operation you can use the prepareSubmission endpoint, sign the returned hash and finally executeSubmission.
UTXO management and locked funds
The default script for creating a transfer above uses automated utxo selection, the automatic being to simply select all utxo’s. In a more professional way, you would want to carefully pick which utxo’s you would like to use as input for your transfers, alongside you might also want to define a custom expiration time for when the transaction should automatically expire.sdk.token.utxos.list({partyId}) or sdk.token.utxos.list({partyId, includeLocked: false}) then it will show 1 utxo of 50 (then one we excluded). This defaults to filtering out the locked utxos.
if we call sdk.token.utxos.list({partyId, includeLocked: true}) then it will show all 3 utxos (100 and 25 both will have a lock).
2-step transfer vs 1-step transfer
The default behavior for all tokens are a 2-step transfer, this matches how funds are usually transferred in TradFi, however this is counter-intuitive in the blockchain world. Canton Coin supports setting up a “Transfer Pre-approval”, this allows a party to designate that he wants to auto-accept all incoming transfer, giving a similar behavior of the blockchain world.Accepting or rejecting a 2-step transfer
If no Transfer pre-approval have been set up, then it is required to fetch incoming transfer instructions and consume either theAccept or Reject choice, this can be done easily using the Wallet SDK.
Withdrawing a 2-step transfer before it gets accepted
Apart from accepting or rejecting a transfer instruction, it is also possible for the sender towithdraw the offer, thereby retrieving the locked funds.
How do i quickly setup transfer preapproval?
It is worth nothing that using the validator operator party as the providing party causes the transfer pre-approval to auto-renew. The below script setup transfer preapproval for Bob and performs a 1-step transfer from Alice to Bob:How to renew or cancel a transfer preapproval
If you have used the validator operator party as the provider, then it will automatically renew the transfer preapproval approximately 20 days before expiry, however there are cases where you would like to perform the preapproval renewal manually:How do I fetch transaction by updateId?
Given an update Id, the token namespace has a method for getting a transaction based on the updateId. This will print out the transaction in the same format assdk.token.holdings
Wallet SDK Configuration
If you have already played around with the wallet SDK you might have come across snippets like:How do I validate my configurations?
Knowing if you are using the correct url and port can be daunting, here is a few curl and gcurl commands you can use to validate against an expected output my-json-ledger-api can be identified withcurl http://${my-json-ledger-api}/v2/version it should produce a json that looks like
curl ${api}/version it should produce an output like
${my-validator-app-api}/v0/scan-proxy.
my-registry-api is the registry for the token you want to use, for Canton Coin you can use my-scan-proxy-api, however for any other token standard token it is required to source the api from a reputable source.
Configuring auth
The wallet-sdk can either take in a Provider (which will have auth bundled into it) or a LedgerClientUrl + TokenProviderConfig. In our examples, we have provided a default TokenProviderConfig for connecting to localnet, which uses a self-signed token.LEDGER_API_AUTH_AUDIENCE & VALIDATOR_AUTH_AUDIENCE.
When upgrading your setup from a localnet setup to a production or client facing environment then it might make more sense to add proper authentication to the ledger api and other services. The community contributions include okta and keycloak OIDC. These can easily be configured for the SDK using a different TokenProviderConfig. The following programmatic methods of token fetching are supported:
- `static`: a fixed, in-memory token. Only used for compatibility, it will totally break for expired tokens.
- `self_signed`: only for development purposes, used for Canton setups that accept HMAC256 self signed tokens.
- `client_credentials`: used to programmatically acquire tokens via oauth2, a.k.a “machine-to-machine” tokens
Registering Plugins
The Wallet SDK supports extending its functionality through a plugin system. Plugins allow you to add custom methods and functionality to the SDK instance while maintaining access to the SDK context and logger.Creating and Registering a Plugin
To create a plugin, extend theSDKPlugin class and implement your custom functionality. Plugins are registered using the registerPlugins method, which accepts a record of plugin constructors keyed by their desired property names.
Key Points
- Plugin Constructor: Plugin classes must accept
SDKContextas a constructor parameter and pass it to thesuper()call along with the plugin name. - Type Safety: The
registerPluginsmethod provides full type safety, ensuring that registered plugins are accessible with proper autocompletion and type checking. - Access to SDK Context: Plugins have access to the SDK’s context, logger, and other internal utilities through the
ctxproperty. - Multiple Plugins: You can register multiple plugins at once by passing them in a single object to
registerPlugins.
Traffic
Below is a high-level summary of the Synchronizer Traffic Fees page in the Splice Validator documentation. For more detail on point, it’s advised to read that documentation.Traffic
- Traffic fees are paid at the validator node level, not the party level.
-
Every validator has a traffic balance at the global synchronizer level.
- Traffic is measured in bytes.
- A trickle rate of free traffic is provided to validator nodes every 10 minutes (each mining round).
-
Traffic is deducted from your validator node’s traffic balance every time your node sends a message to the synchronizer. Traffic is charged for:
- Broadcasting a transaction - this is where the bulk of the traffic fees will be paid.
- Sending consensus messages for transactions a validator is involved in.
- If your node runs out of traffic it is unable to transact. It’ll recover by itself thanks to the free trickle rate. However, you can buy more traffic. See the next section.
Getting more traffic
- Traffic is obtained by burning Canton Coin and it is always pre-purchased.
-
The conversion Canton Coin <> Bytes can be derived from on-chain parameters.
- Super Validators publish an on-chain conversion CC <> USD.
- Super Validators publish a traffic cost USD <> Bytes.
-
Anyone can burn Canton Coin to get traffic for any node.
- You can buy your own traffic.
- You can sign up with a service like the Denex Gas Station to buy your traffic.
- The validator node has automation to keep traffic topped up. As long as you keep CC in your validator party, it’ll stay available. See here for how to configure automatic traffic purchases.
How to determine the traffic cost of a transaction?
Follow this FAQ entry in the Splice documentation.Tokenomics and Rewards
CC Rewards
- The tokenomics operate on 10m “mining rounds”.
- Every 10 minutes, different stakeholders of the network are rewarded with coupons which can be used to mint Canton Coin according to how much value they’ve brought to the network.
- Coupons are rewarded to the Validator admin party.
- All rewards awarded to a node’s local parties will be auto-minted by the node administrator party.
- The validators automation is not able to mint the rewards for an external parties - the external party needs to delegate the ability for the validator admin party to mint their rewards on their behalf or manually mint the rewards themselves each round they receive rewards.
- All rewards and coupons are mintable the follow mining round
- If rewards are not redeemed then they are lost*
Ways of Obtaining Canton Coin Rewards
The tokenomics of the network give you options for obtaining Canton Coin:Validator & Super Validator Liveness Rewards
Just for being online and growing the network, Canton Coin tokenomics enable validator operators to mint CC. Validators and Super Validators generate reward coupons that can be used to mint Canton Coins. The coupons are paid out to the validator adminstration party. For local parties onboarded to a validator, the validator application runs background automation to mint all activity records automatically. An external party signs transactions using a key they control. As a consequence, the validator automation is not able to perform minting for external parties. For external parties, automation needs to be developed to callAmuletRules_Transfer at least once per round with all activity records as inputs.
You can find more information about the tokenomics of Canton Coin at /overview/reference/canton-coin-tokenomics.
All rewards and coupons are mintable the follow mining round, if rewards are not redemed then they are lost
Validator Activeness Rewards
If you self-purchase traffic, you get a discount via these rewards.Application Rewards and Featured Activity Markers
Application Rewards- Transactions which include Canton Coin and featured application transactions earn application rewards.
- The percentage of Canton Coin awarded to applications is significant and will grow over time.
- The current amount of CC awarded to applications can be seen in the ‘Canton Coin Reward Split By Role Over Time’ chart here.
- Applications which generate valuable activity for the canton network, and have ‘featured application’ status can earn more application rewards.
- By qualifying as a Featured Application (apply here) and applying a
FeaturedAppActivityMarkerto a transaction it is marked and converted to reward coupons that can be redeemed. - A weighting is applied to each transaction in that Canton Coin minting round.
- More weightings in a round equate to more application rewards.
- Currently, featured apps receive many more rewards in Canton Coin than the average transaction costs in traffic fees.
Gaining Application Rewards as a Wallet/Custodian/Exchange
- Request featured application status. Apply here.
- On DevNet you can self-feature through the wallet UI.
- One way that wallets can earn app rewards is by enabling direct / 1 step / pre-approval transfers
- Setting up pre-approvals costs around $1 per 90 days per party
- By enabling 1-step transfers your party is added as the operator party to incoming deposits
- Therefore, when users deposit funds into your account you’ll receive rewards.
- You can also mark transactions out of your wallet (that don’t go to parties which have 1-step transfers enabled) with your party as the operator part for that transaction
- It’s anticipated that you will receive far more Canton Coin through rewards for pre-approval deposits and transfers than you pay in traffic fees, setting up pre-approvals and for creating parties.
- Therefore:
- You may not want to charge your users for traffic in the near term.
- In the mid-to-long term the tokenomics may not support this model, so you may want to think about a charging strategy.
- We still advise monitoring or even controlling the number of parties that a user can create so that you don’t end up with users creating too many parties and therefore cost.
Redeming Reward Coupons with External Party
To accept rewards with an external party you need to callAmuletRules_Transfer with the activity records as inputs.
Sharing Featured Application Reward between multiple parties
Featured Application rewards can be shared between multiple parties, this can be done by defining a list of benificiaries and give them a weighted amount of the total reward. The sum of all beneficiaries weight must be equal to 1.0. This results in separate coupons being generated for each beneficiary.User Management
The Wallet SDK has functionality for creating and managing user rights, by default when you are connecting it uses whichever user is defined in your auth-controller. If the user is an admin user on the ledger api they can be used to create other users and grant them rights.How do I quickly setup canReadAsAnyParty and canExecuteAsAnyParty?
This script sets up three usersalice, bob and master. master is given canReadAsAnyParty and canExecuteAsAnyParty and it shows proper access control by creating parties and ensuring that alice and bob can not see each others parties.
Creating a new user
Creating a new user can be done using the adminLedger, this new user can then be granted rights or can create new parties as needed.ReadAs and ActAs limitations
Currently when allocating a new party we also grant ReadAs and ActAs rights for that party for the submitting user. This allows the user to do the normal flows involved like preparing transactions and executing those. There are performance issues if too many of these rights are assigned to the same user, in the case of amaster user that is interacting on behalf of a client, then it might be more convenient to use CanReadAsAnyParty and CanExecuteAsAnyParty as described below.
Here is how the method changes if you need to allocate a party without granting rights:
CanReadAsAnyParty
CanReadAsAnyParty gives a user full information about any party on the ledger, if a user is set up with this they will see: 1. All parties hosted on the ledger (multi-hosted and single hosted) 2. All transaction happening involving a party on the ledger 3. Prepare transactions on behalf of any party This will not grant information about parties hosted on other ledgers or their transactions.listWallets.
CanExecuteAsAnyParty
CanExecuteAsAnyParty gives full execution rights for a party, this means that a user with these rights can submit transaction on behalf of a party hosted on the ledger. This does not give the user rights to move funds without a valid signature! The setup is similar to the `CanReadAsAnyParty`:Canton Coin Specific Considerations
Handling Time-Bound Signatures (Canton Coin)
If your wallet infrastructure relies on offline signing, cold storage, or multi-party approval flows that take longer than 10–20 minutes, then this guide is for you.The 10-Minute Signing Window
Canton Coin transactions operate on a strict 10-minute minting cycle. Unlike standard Daml transactions, Canton Coin transfers and acceptances must reference a specific OpenMiningRound contract to calculate network fees and rewards.- A new
OpenMiningRoundis created every 10 minutes. - The contract remains active for approximately 20 minutes (the current round + overlap).
- The Problem: If you prepare a transaction referencing Round A, but you do not sign and submit it before Round A expires, the network will reject it.
409 Conflict with the following error:
Solution 1: Implement Pre-approvals for Incoming Transfers / Receiving Funds
Use Case: Your users need to receive Canton Coin, but you cannot sign a transaction within 10 minutes (e.g., due to cold storage of the receiver’s keys). The Fix: Enable 1-Step Transfers using Pre-approvals. Instead of signing every incoming transfer, the receiver signs a single, long-livingTransferPreapproval contract. This authorizes the sending party (or a specific provider) to deposit funds immediately without requiring an interactive acceptance signature for every transaction.
To do this, create a Splice.Wallet.TransferPreapproval contract. The guide on how to create the pre-approval contract in the Wallet SDK is here and the general information about Canton Coin Preapprovals is here. By implementing a preapproval contract the receiver doesn’t need to accept Canton Coin transfers sent to them as they are automatically accepted.
Solution 2: Use Command Delegation for Outgoing Transfers / Sending Funds
Using
TransferCommand only works where the receiver has enabled pre-approvals for Canton Coin and the sending external party has been onboarded to the splice wallet using the Validator APIs. Parties set up using the validator APIs and not using these workarounds are subject to the 200 party limit described here.How it works
- User Signs Instruction: The user signs a transaction to create a
Splice.ExternalPartyAmuletRules.TransferCommandcontract.- This contract does not reference a mining round.
- It can remain valid for up to 24 hours (or as defined by
expiresAt).
- Delegated Execution: Once this command is on the ledger, a Super Validator (SV) or a delegate picks it up.
- Execution: The delegate executes the actual transfer. The delegate selects the current
OpenMiningRoundat the moment of execution, ensuring the transaction succeeds regardless of how long ago the user signed the instruction.
Sending Deposits to Exchanges
To enable deposits to be sent to specific user accounts at exchanges, an account identifier needs to be sent to the exchange along with the transfer information. In Canton, the “memo tag” pattern is implemented as follows.Canton Coin Wallet
In the Canton Coin wallet, the “Description” field in the screenshot below must be used to communicate this account identifier in the format required by the exchange. For example: “AcmeExchange account: <exchangeInternalAccountId>”.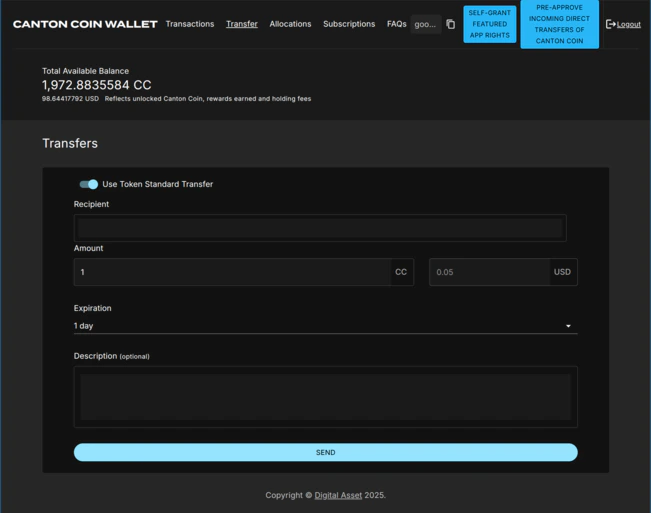
CN Token Standard Wallets
The token standard defines thesplice.lfdecentralizedtrust.org/reason metadata key for the purpose of communicating a human-readable description for the transfer (see CIP-0056).
Token standard wallets must provide a “Description” or “Reason” field analogous to the Canton Coin wallet, and store its value in the metadata field of the Transfer specification (code) when initiating a transfer. This is actually what the Canton Coin wallet does behind the scenes when initiating a Canton Coin transfer.
Likewise when displaying an incoming transfer or the tx history for a transfer the content of splice.lfdecentralizedtrust.org/reason metadata key should be parsed and displayed, as done for example by the transaction history parser in the token standard CLI (docs). This allows exchanges to communicate a correlation-id for a redemption.
Code sample for setting the right metadata field: see this change to the experimental token standard CLI to take the “reason” as command line argument and store it in the metadata field.
CN Token Registries
Token standard compliant registries must ensure that they pass theTransfer specification unchanged along when implementing multi-step transfers using the TransferInstruction interface (code).
USDCx Support for Wallets
Overview
Circle and Digital Asset have partnered to develop and implement a USDC token on Canton Network. This implementation requires users to send USDC on L1 chains (starting with Ethereum) to Circle’s xReserve contract which is then created as a USDC token on Canton Network. Conversely a withdrawal request for a USDC token on the Canton Network will result in the release of the asset on another chain. During the existence of the USDC token on Canton Network, it is available for use in financial transactions. USDC on Canton Network represents USDC locked by Circle on the original L1 chain. And this token on Canton Network, is in the form of a Canton Network Standard Token (CIP-56) as defined through the Canton Network Utilities service. Wallet providers and exchanges have three options for supporting USDCx on the Canton Network:- Transfer & hold USDCx - Since USDCx is a token standard (CIP-56) compliant asset then as such any wallet that supports the token standard will have built in support for transfers and holding.
- Support xReserves deposits and withdrawals - Custom API integration is required for wallet providers and exchanges to support xReserve deposits and withdrawals to the utility-bridge daml models to / from their parties using the xReserves UI. Instructions for doing this are included in the section “Supporting xReserve Deposits and Withdrawals” below.
-
Integrating the xReserve UI (Ethereum) into the wallet - To enable a full end-to-end experience for the user, a wallet can integrate against Ethereum directly for deposits on top of integrating point 2. To provide an example for doing this, the xReserves UI as well as open-sourced example scripts are available for reference. This demonstrates the 2 ethereum transactions that must be submitted to an ethereum node:
- approve a USDC spending allowance.
- depositToRemote to deposit USDC into the xReserve contract.
Supporting xReserve Deposits and Withdrawals
The required dar file can be found here There are 3 choices (API calls) a wallet will need to implement in order to fully support the xReserve:Onboarding
To use the xReserve a party will first need to onboard to the bridge using the below: Example API call:Mint
Once a user deposits USDC into ethereum a DepositAttestation is created on the Canton network. In order for the recipient party to claim those funds they will need to call a choice to mint from the DepositAttestation:\#utility-bridge-v0:Utility.Bridge.V0.Attestation.Deposit:DepositAttestation
Example API call:
Withdraw
To withdraw from the Canton Network to Ethereum a user must burn the USDC on Canton. Specifying the:- destination domain id: Currently only Ethereum is supported (domain id of 0).
- Amount: In Decimal to a max 6 decimal precision.
- Destination recipient: a valid Ethereum address.
- An optional reference. Empty Text field if not provided.
- The available Holding contract Ids
- A UUID as the requestId
Extracting Contract IDs and Disclosed Contracts
The utilities backend provides a Burn Mint Factory API Endpoint Endpoint:$/api/utilities/v0/registry/burn-mint-instruction/v0/burn-mint-factoryExample request body:
When you call the Burn Mint factory endpoint, the response contains the contract IDs and disclosed contracts you need for both minting and withdrawing. Note that these values can be cached to reduce api calls as these values change infrequently. As an example for extracting the required contexts and contracts from the response:
MainNet Environment Variables
| Variable | Value |
|---|---|
| UTILITY_BACKEND_URL | https://api.utilities.digitalasset.com |
| ADMIN_PARTY_ID | decentralized-usdc-interchain-rep::12208115f1e168dd7e792320be9c4ca720c751a02a3053c7606e1c1cd3dad9bf60ef |
| UTILITY_OPERATOR_PARTY_ID | auth0_007c6643538f2eadd3e573dd05b9::12205bcc106efa0eaa7f18dc491e5c6f5fb9b0cc68dc110ae66f4ed6467475d7c78e |
| BRIDGE_OPERATOR_PARTY_ID | Bridge-Operator::1220c8448890a70e65f6906bd48d797ee6551f094e9e6a53e329fd5b2b549334f13f |
TestNet Environment Variables
| Variable | Value |
|---|---|
| UTILITY_BACKEND_URL | https://api.utilities.digitalasset-staging.com |
| ADMIN_PARTY_ID | decentralized-usdc-interchain-rep::122049e2af8a725bd19759320fc83c638e7718973eac189d8f201309c512d1ffec61 |
| UTILITY_OPERATOR_PARTY_ID | DigitalAsset-UtilityOperator::12202679f2bbe57d8cba9ef3cee847ac8239df0877105ab1f01a77d47477fdce1204 |
| BRIDGE_OPERATOR_PARTY_ID | Bridge-Operator::12209d011ce250de439fefc35d16d1ab9d56fb99ccb24c18d798efb22352d533bcdb |