Exchange Integration Guide
The pages below guide you how to integrate an exchange with Canton for the purpose of trading Canton Network Token Standard compliant tokens like Canton Coin. The core of such an integration is automating the deposits and withdrawals of tokens to and from the exchange. The guide can thus also be used for services other than exchanges that want to support deposits and withdrawals of Canton Network tokens.- Overview
- Integration Architecture
- Integration Workflows
- Transaction History Ingestion Details
- Fault Tolerance
- Validator Node Operations
- Backup and Restore
- Integration Testing
- Integration Extensions
Overview
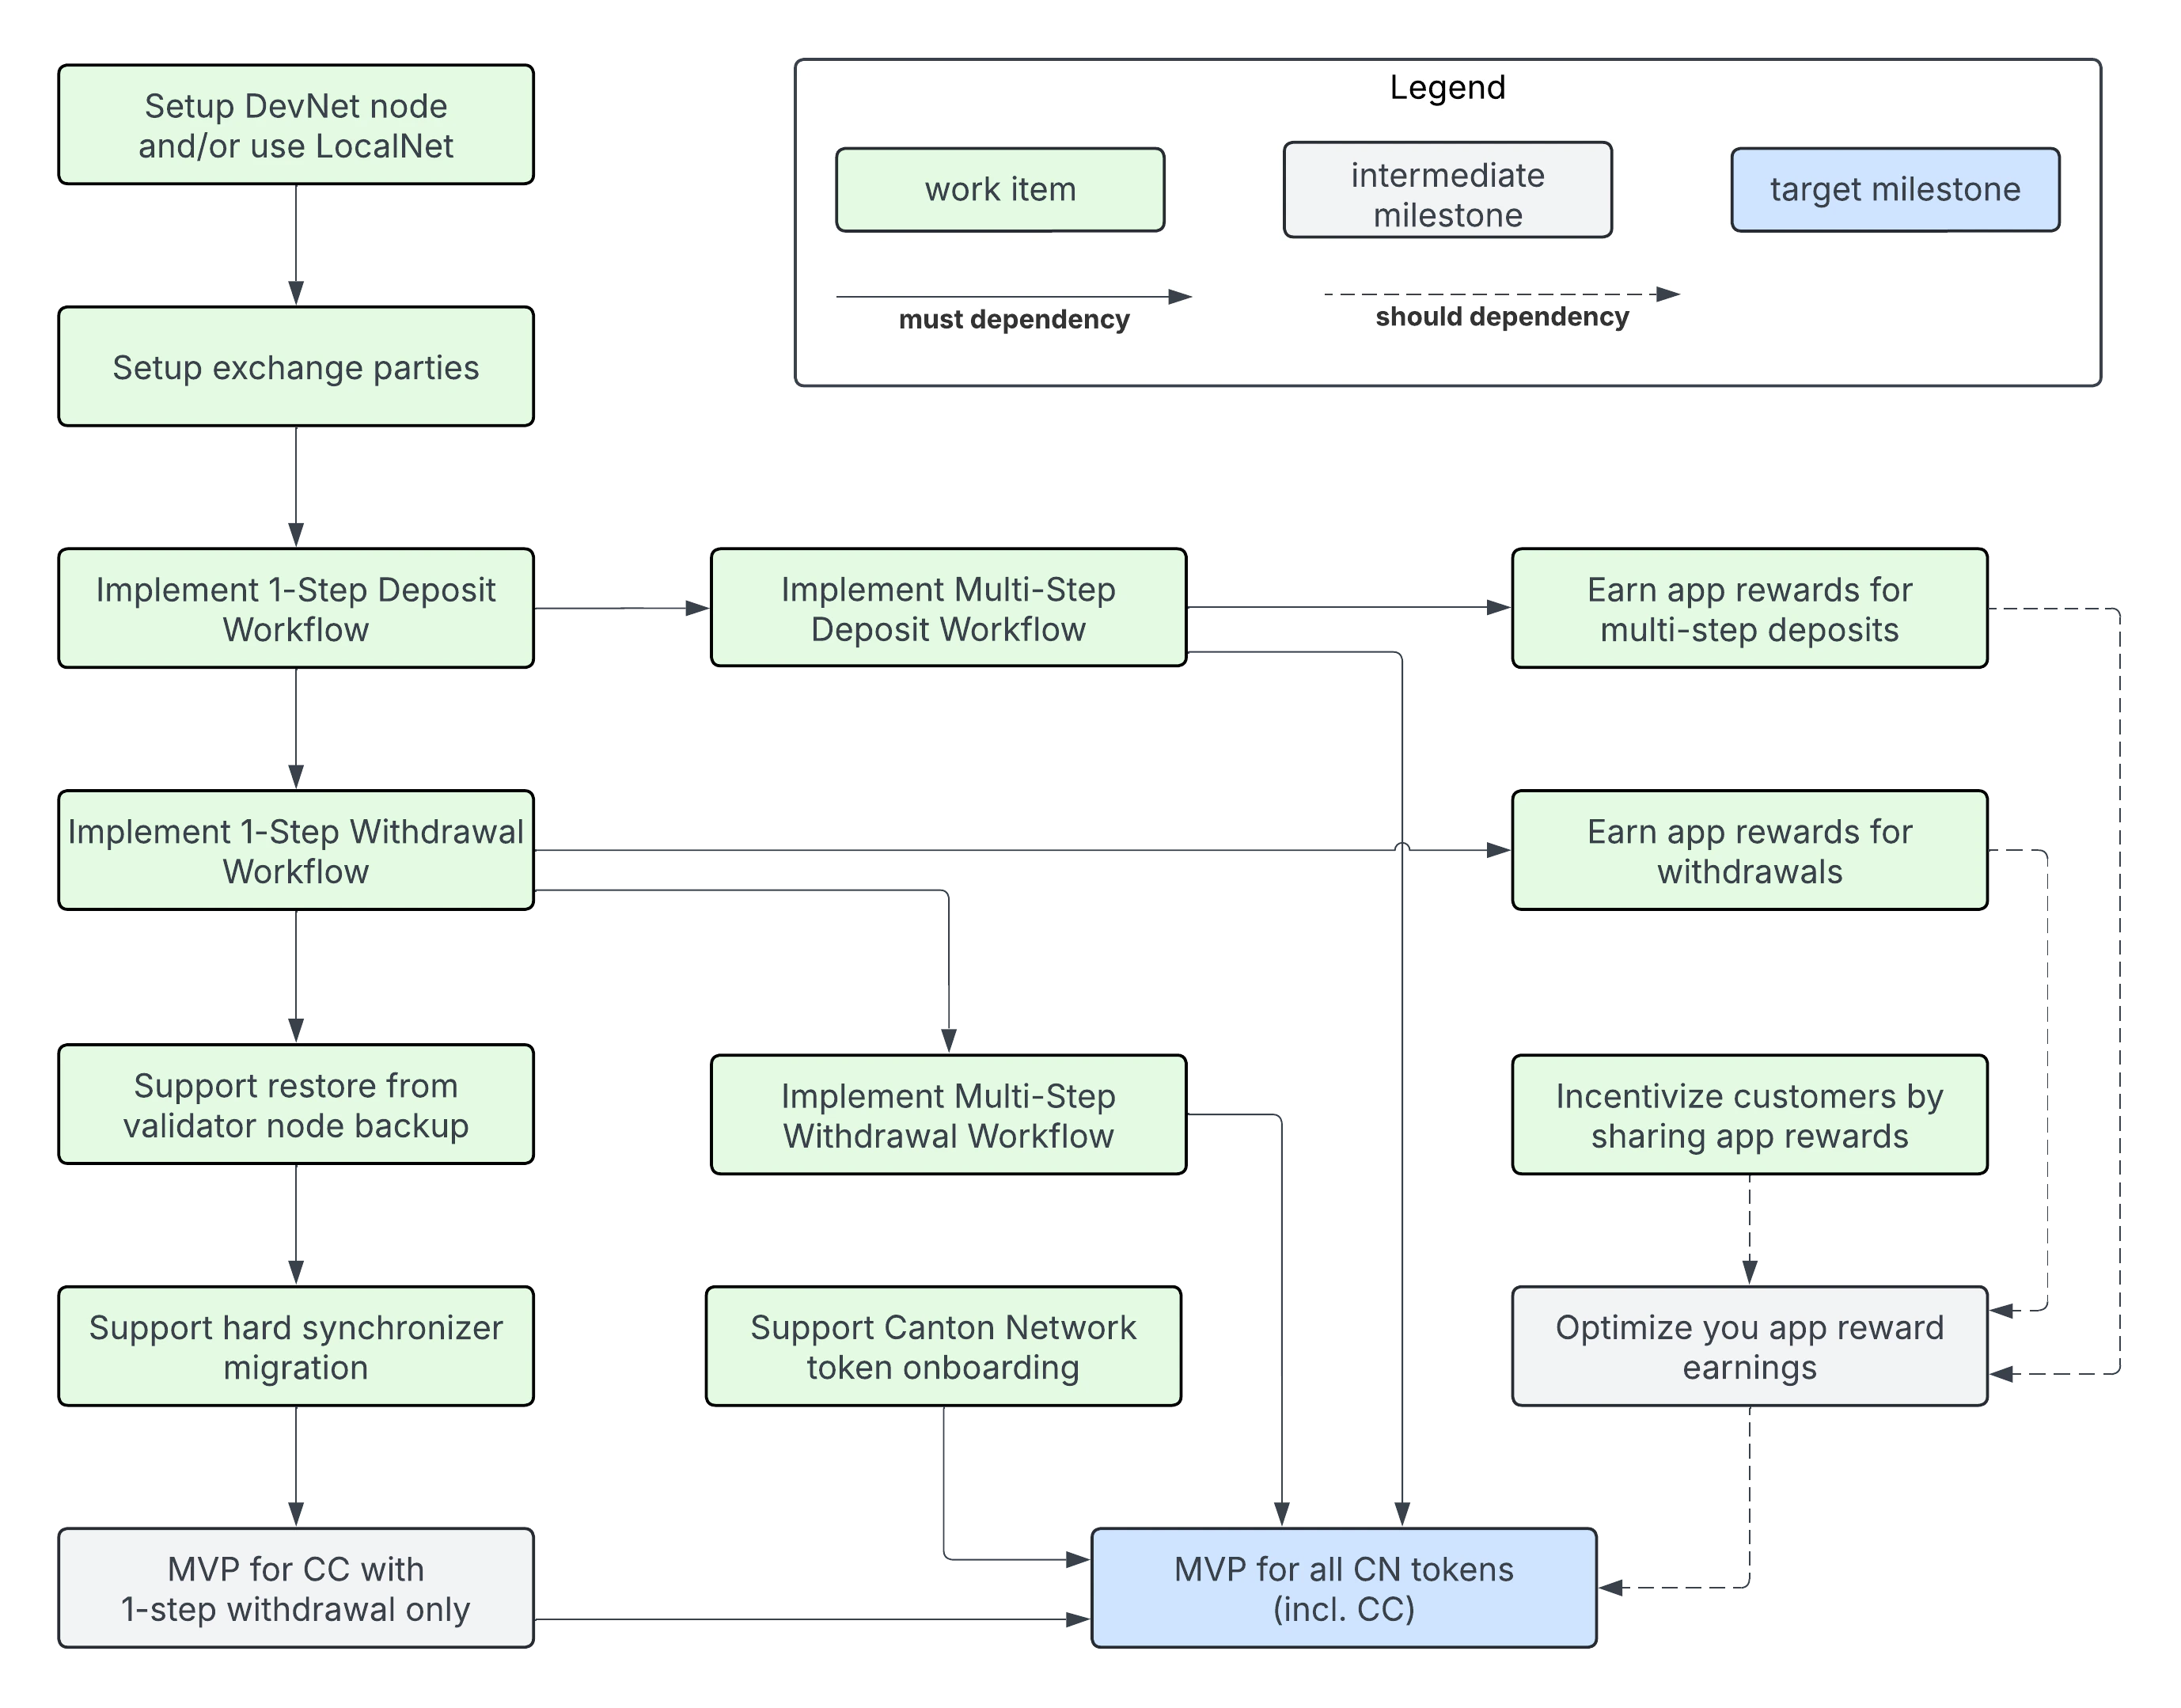
This guide aims to help you integrate your exchange with Canton for the purpose of trading Canton Coin (CC) and Canton Network (CN) tokens.What to develop in what order?
This material is comprehensive guidance for integrating with the Canton Network. You may need to review it several times to become familiar with Canton’s UTXO-based chain, smart contract language, and its privacy model. The guide is intentionally structured such that you can use a learning-by-doing approach that delivers your integration in a series of incremental milestones:- Canton Coin (CC) with 1-step withdrawal only.
- Support for all CN Tokens, not just CC.
- Earning additional application rewards for all CN tokens.
- all CN tokens
- CC users that prefer to control the receipt of transfers, and thus do not want to setup preapprovals
- earning app rewards for all deposits and withdrawals
- Setup DevNet node and/or use LocalNet
exchange-parties-setupone-step-deposit-workflowone-step-withdrawal-workflow- Support restore from validator node backup
- Support hard synchronizer migration
multi-step-deposit-workflowmulti-step-withdrawal-workflow, which resolves the limitation that users must setup a CC transfer preapproval to receive withdrawals.token-onboarding
withdrawal-app-rewardsdeposit-app-rewardsshare-rewards-with-customers
Integration support code
Use the following support code to simplify your integration development for:
- JavaScript/TypeScript: use the functions from the Wallet SDK to simplify building your integration.
- Java/JVM: use the sample code from the https://github.com/digital-asset/ex-java-json-api-bindings repository as a starting point.
- Other languages: use the code from the Wallet SDK or the Java sample code as a blueprint.
Integration Architecture
High-Level Overview
merge, link, align this brief summary with the overview in the wallet integration guide
If you have integrated your exchange with other BTC and other UTXO-based chains, the architecture presented here will be familiar and you will be able to reuse existing components and patterns. Before jumping into the discussion, it is important to map your preexisting concepts using the following mapping:
- Transactions are identified in Canton using their globally unique update-id.
- Each transaction is committed at specific record time that is assigned by the synchronizer used to commit the transaction.
- Blockheight in BTC can be mapped to the record time of the Global Synchronizer in Canton Network.
- BTC UTXOs map to what are usually called active contracts in Canton. Every Canton contract carries data of a specific Daml template type. For ease of understanding, we often refer to active contracts as “UTXOs” in this guide.
- BTC addresses map to parties in Canton.
- Validator nodes host parties and store their private data. Validator nodes also expose the Ledger API (LAPI), which can be used by an owner of a party to read their party’s state and transactions.
- Canton is designed as a network-of-networks where each network is a separate synchronizer that is distinct and separate from other synchronizers. For example, the Global Synchronizer is a synchronizer that connects validators in its network.
- Validator nodes can be connected to multiple synchronizers. Validator nodes merge the data streams from all connected synchronizers into a single logical stream, which is why they assign a local Ledger API offset to every transaction. These offsets are not comparable across validator nodes, but update-ids and record times are.
- Transactions in Canton have a hierarchical structure that reflects the nested execution and visibility of Daml choices. This hierarchical structure guarantees privacy between parties in the same transaction. Different validator nodes may see different sub-trees of the same transaction depending on which parties they host.
- Memos are stored in the transfer metadata using the
splice.lfdecentralizedtrust.org/reasonkey. The Canton Network Token Standard defines this key and a way to parse these memo tags and other transfer information from transactions.
Component Overview
The following diagram shows the components to integrate an exchange’s internal systems with Canton Network. We explain the components in the subsections below.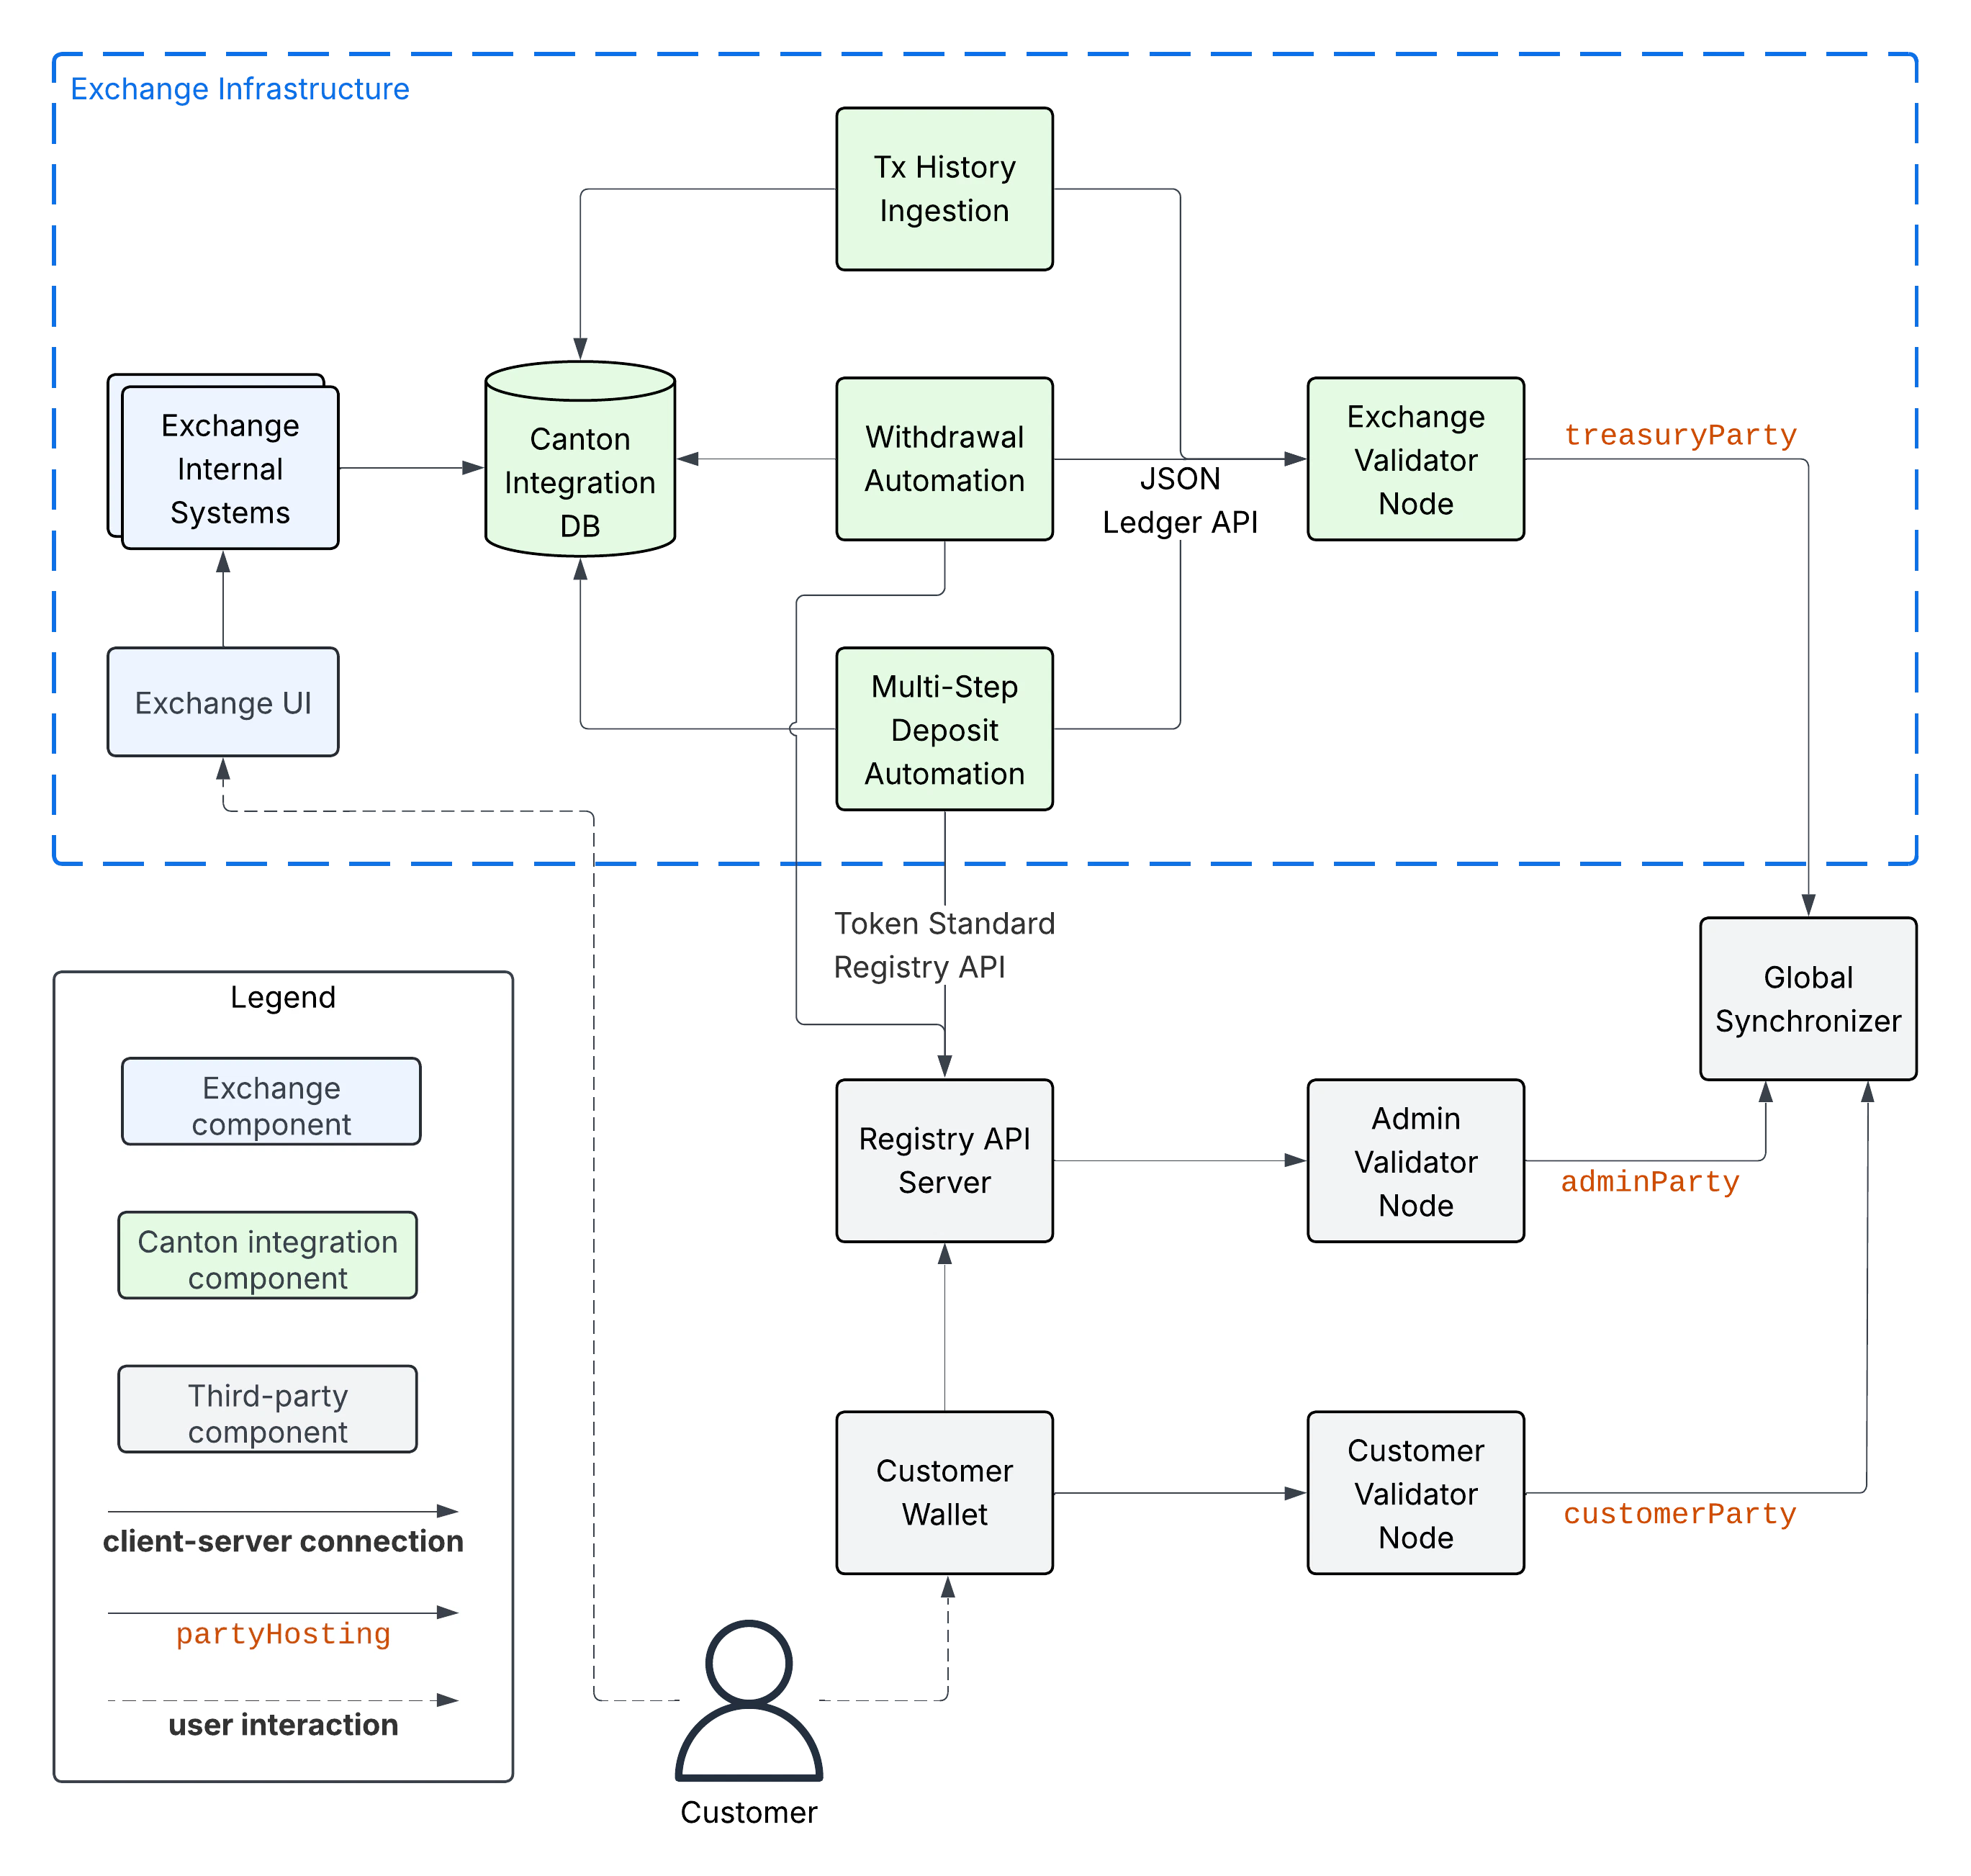
Exchange Components
This guide assumes that there are Exchange Internal Systems that manage, among other things, the exchange’s internal ledger of Customer balances. These systems serve data to the Exchange UI, which is used by exchange customers to trade, observe their deposits, and request withdrawals of funds to their wallets. The guide’s assumptions might not perfectly match your exchange’s actual architecture. We encourage you to consider them in spirit and map the diagram as best as possible.Canton Integration Components
There are five Canton integration components:- The Exchange Validator Node is a Splice validator node that hosts your
treasuryParty, which is the party you setup to control funds, receive deposits, and execute transfers for withdrawals. Seeexchange-parties-setupfor details on how to setup thetreasuryParty. You can deploy and operate a validator yourself or use a node-as-a-service provider to operate it for you. - The Canton Integration DB is used to keep track of the state of withdrawals and the customer-attribution of the funds held by the
treasuryParty. It is shown as a separate component in the diagram, but it could be part of an existing databases. - The Tx History Ingestion service uses the JSON Ledger API exposed by the Exchange Validator Node to read Daml transactions affecting the
treasuryParty. It parses these transactions and updates the Canton Integration DB with the effect of these transactions (e.g. a successful deposit to a customer account). - The Withdrawal Automation service is responsible for executing withdrawals requested by the Exchange Internal Systems via the Canton Integration DB.
- The Multi-Step Deposit Automation service is responsible for accepting or rejecting transfers from customers to their exchange accounts for CN tokens that do not support direct transfers. It is not necessary for an integration with Canton Coin, which does support direct, 1-step transfers.
architecture-high-level-overview, you should be able to build these services as thin wrappers over the functionality provided by the wallet SDK and reuse the DB schemas from your existing UTXO-based integrations. We explain the expected functionality of the services and the state they store in the Canton Integration DB in the integration-workflows section.
Third-Party Components
The purpose of the third-party components in the diagram above (in gray) is:- The Global Synchronizer serves the validator nodes to commit Daml transactions in a decentralized and fault-tolerant manner.
- The Customer Validator Node is the validator node that hosts the
customerPartywhich is used by the Customer to hold and transfer their funds. - The Customer Wallet is the wallet used by the customer to manage their funds and make transactions.
- The Admin Validator Node is the validator node used by the token administrator to track the ownership records of the token and validate changes to them. We use the
adminPartyto refer to the party that represents them on ledger. Note that theadminPartyfor a decentralized token is hosted on multiple validator nodes. For example theadminPartyfor Canton Coin is hosted on every SV node. - The Registry API Server provides access to extra context to execute token transfers. This context is often only known to the token administrator, which is why access is provided to it off-ledger. The OpenAPI specification of the Registry API is maintained as part the Canton Network Token Standard definitions in the Splice repository.
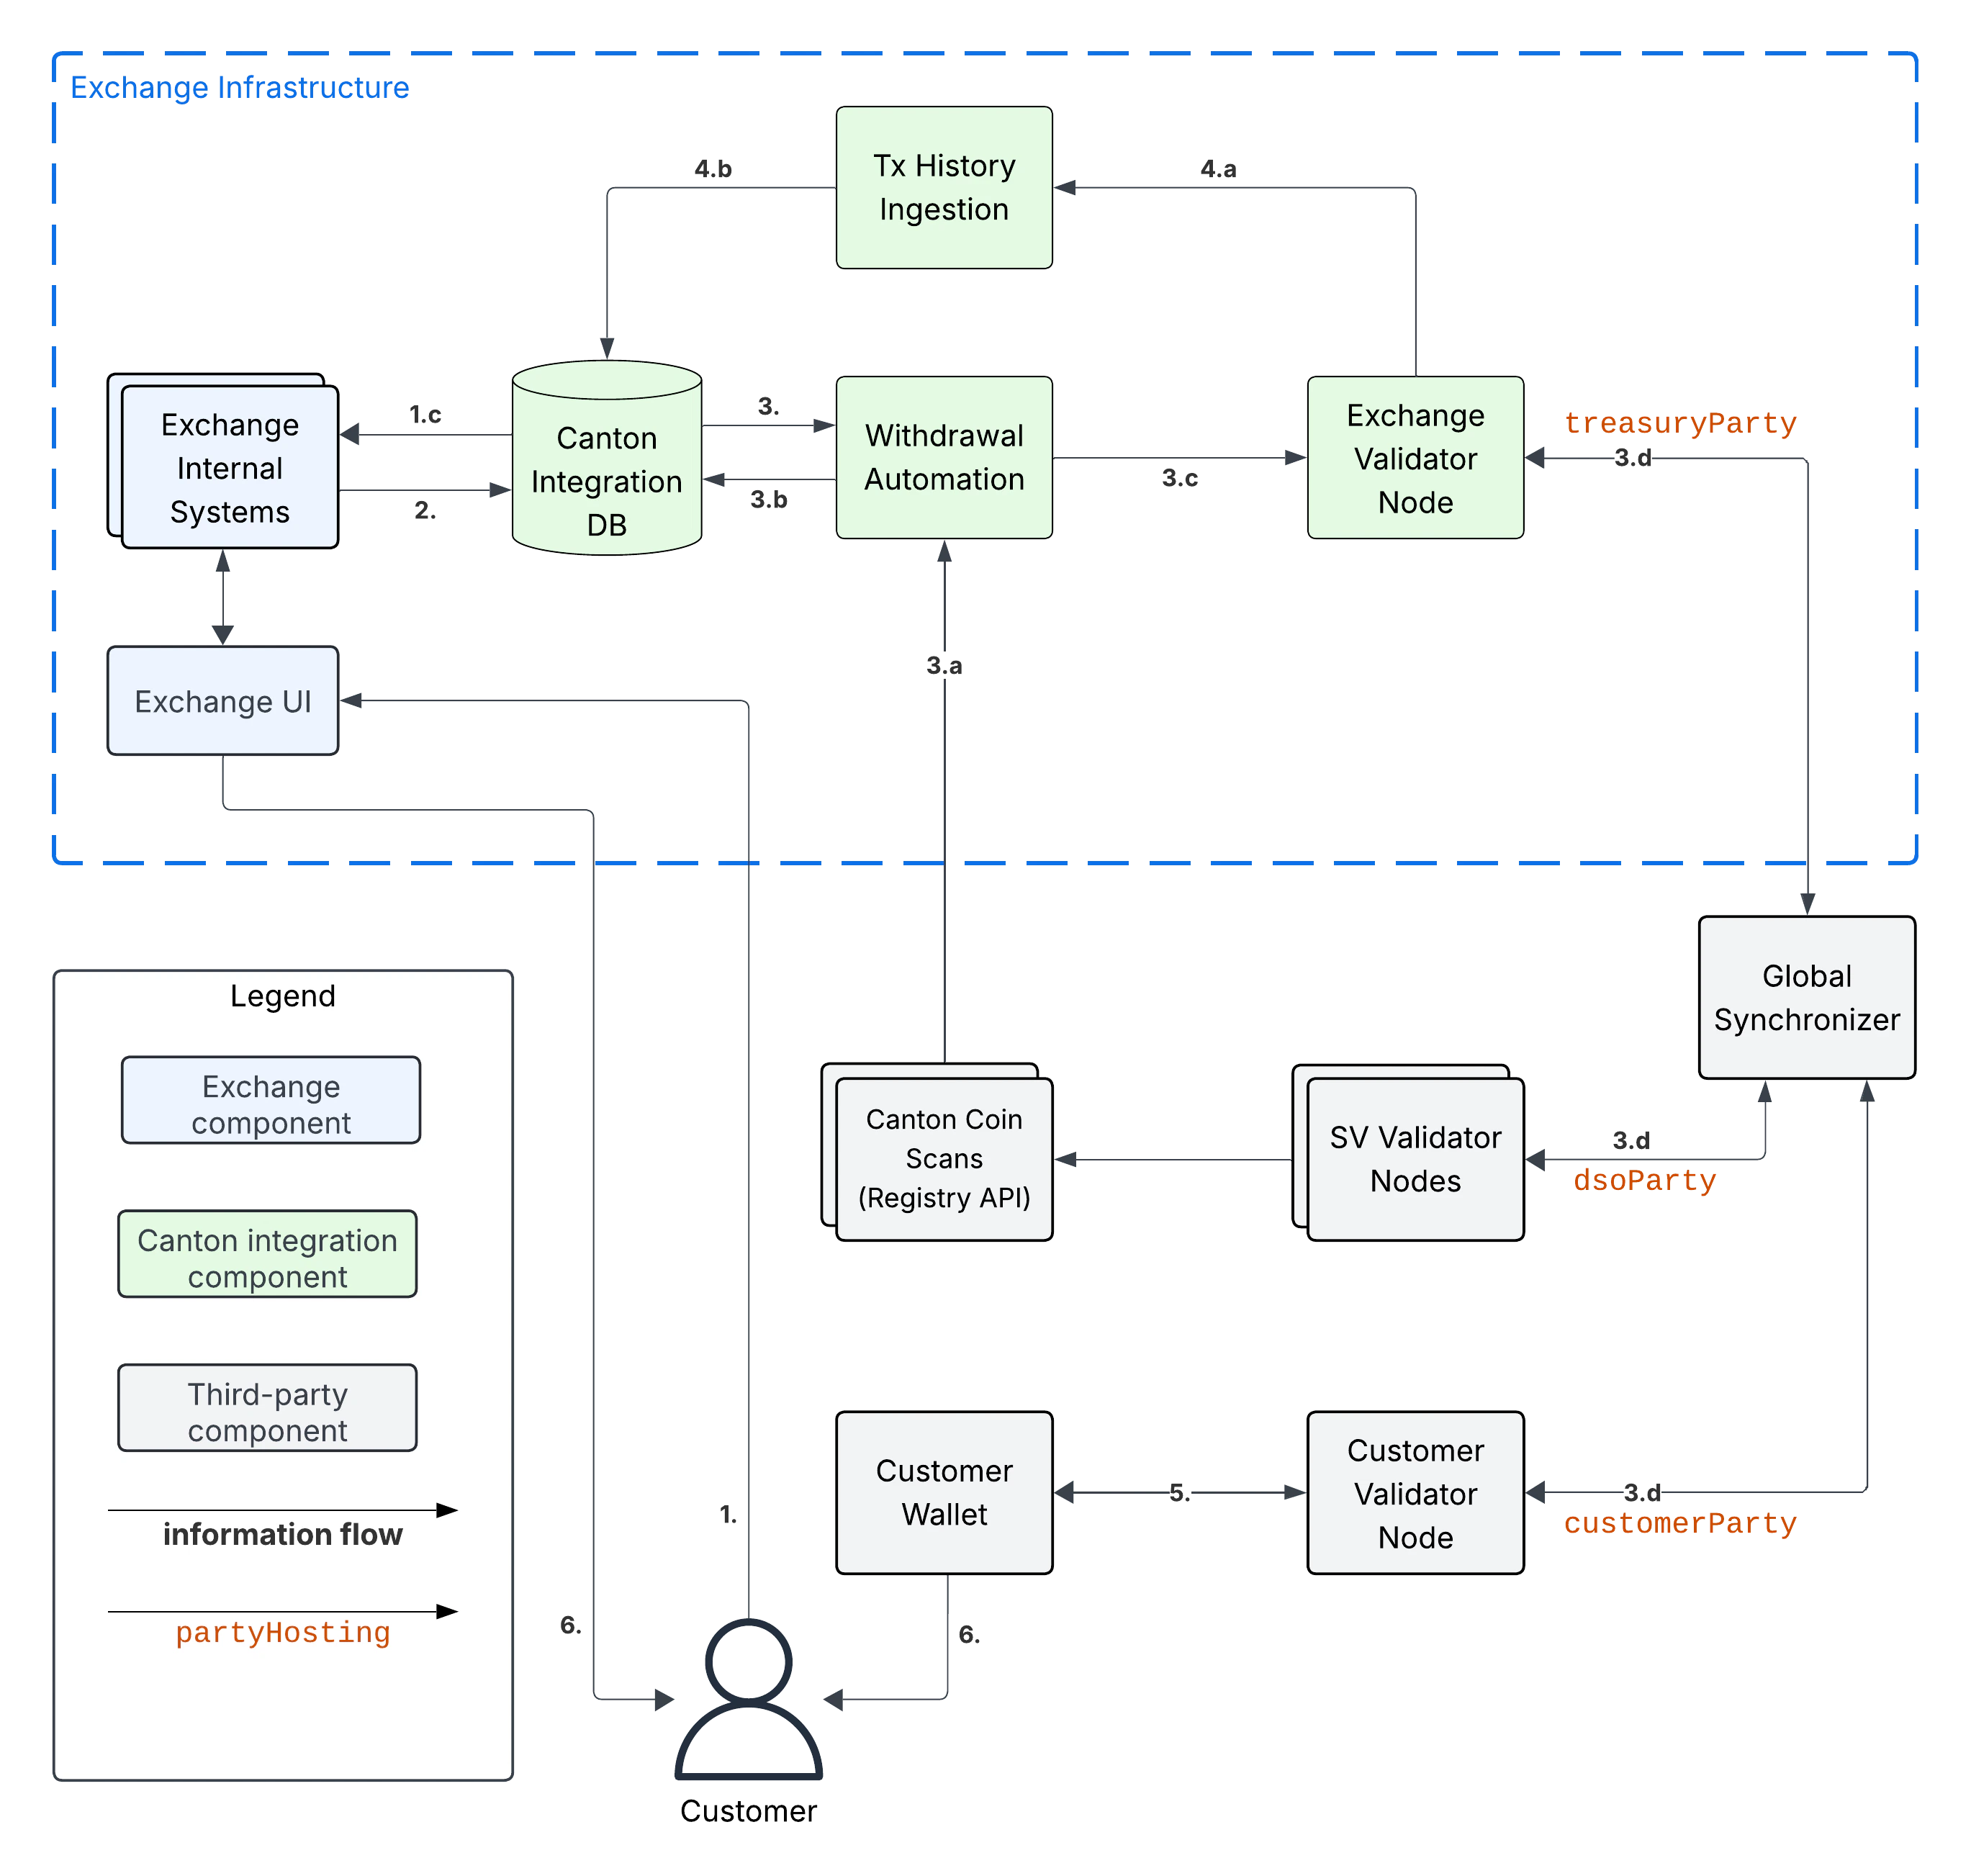
Information Flows
The following diagram shows the information flows between the components. The main information flows of the Canton integration are highlighted using bold arrows. We explain them below.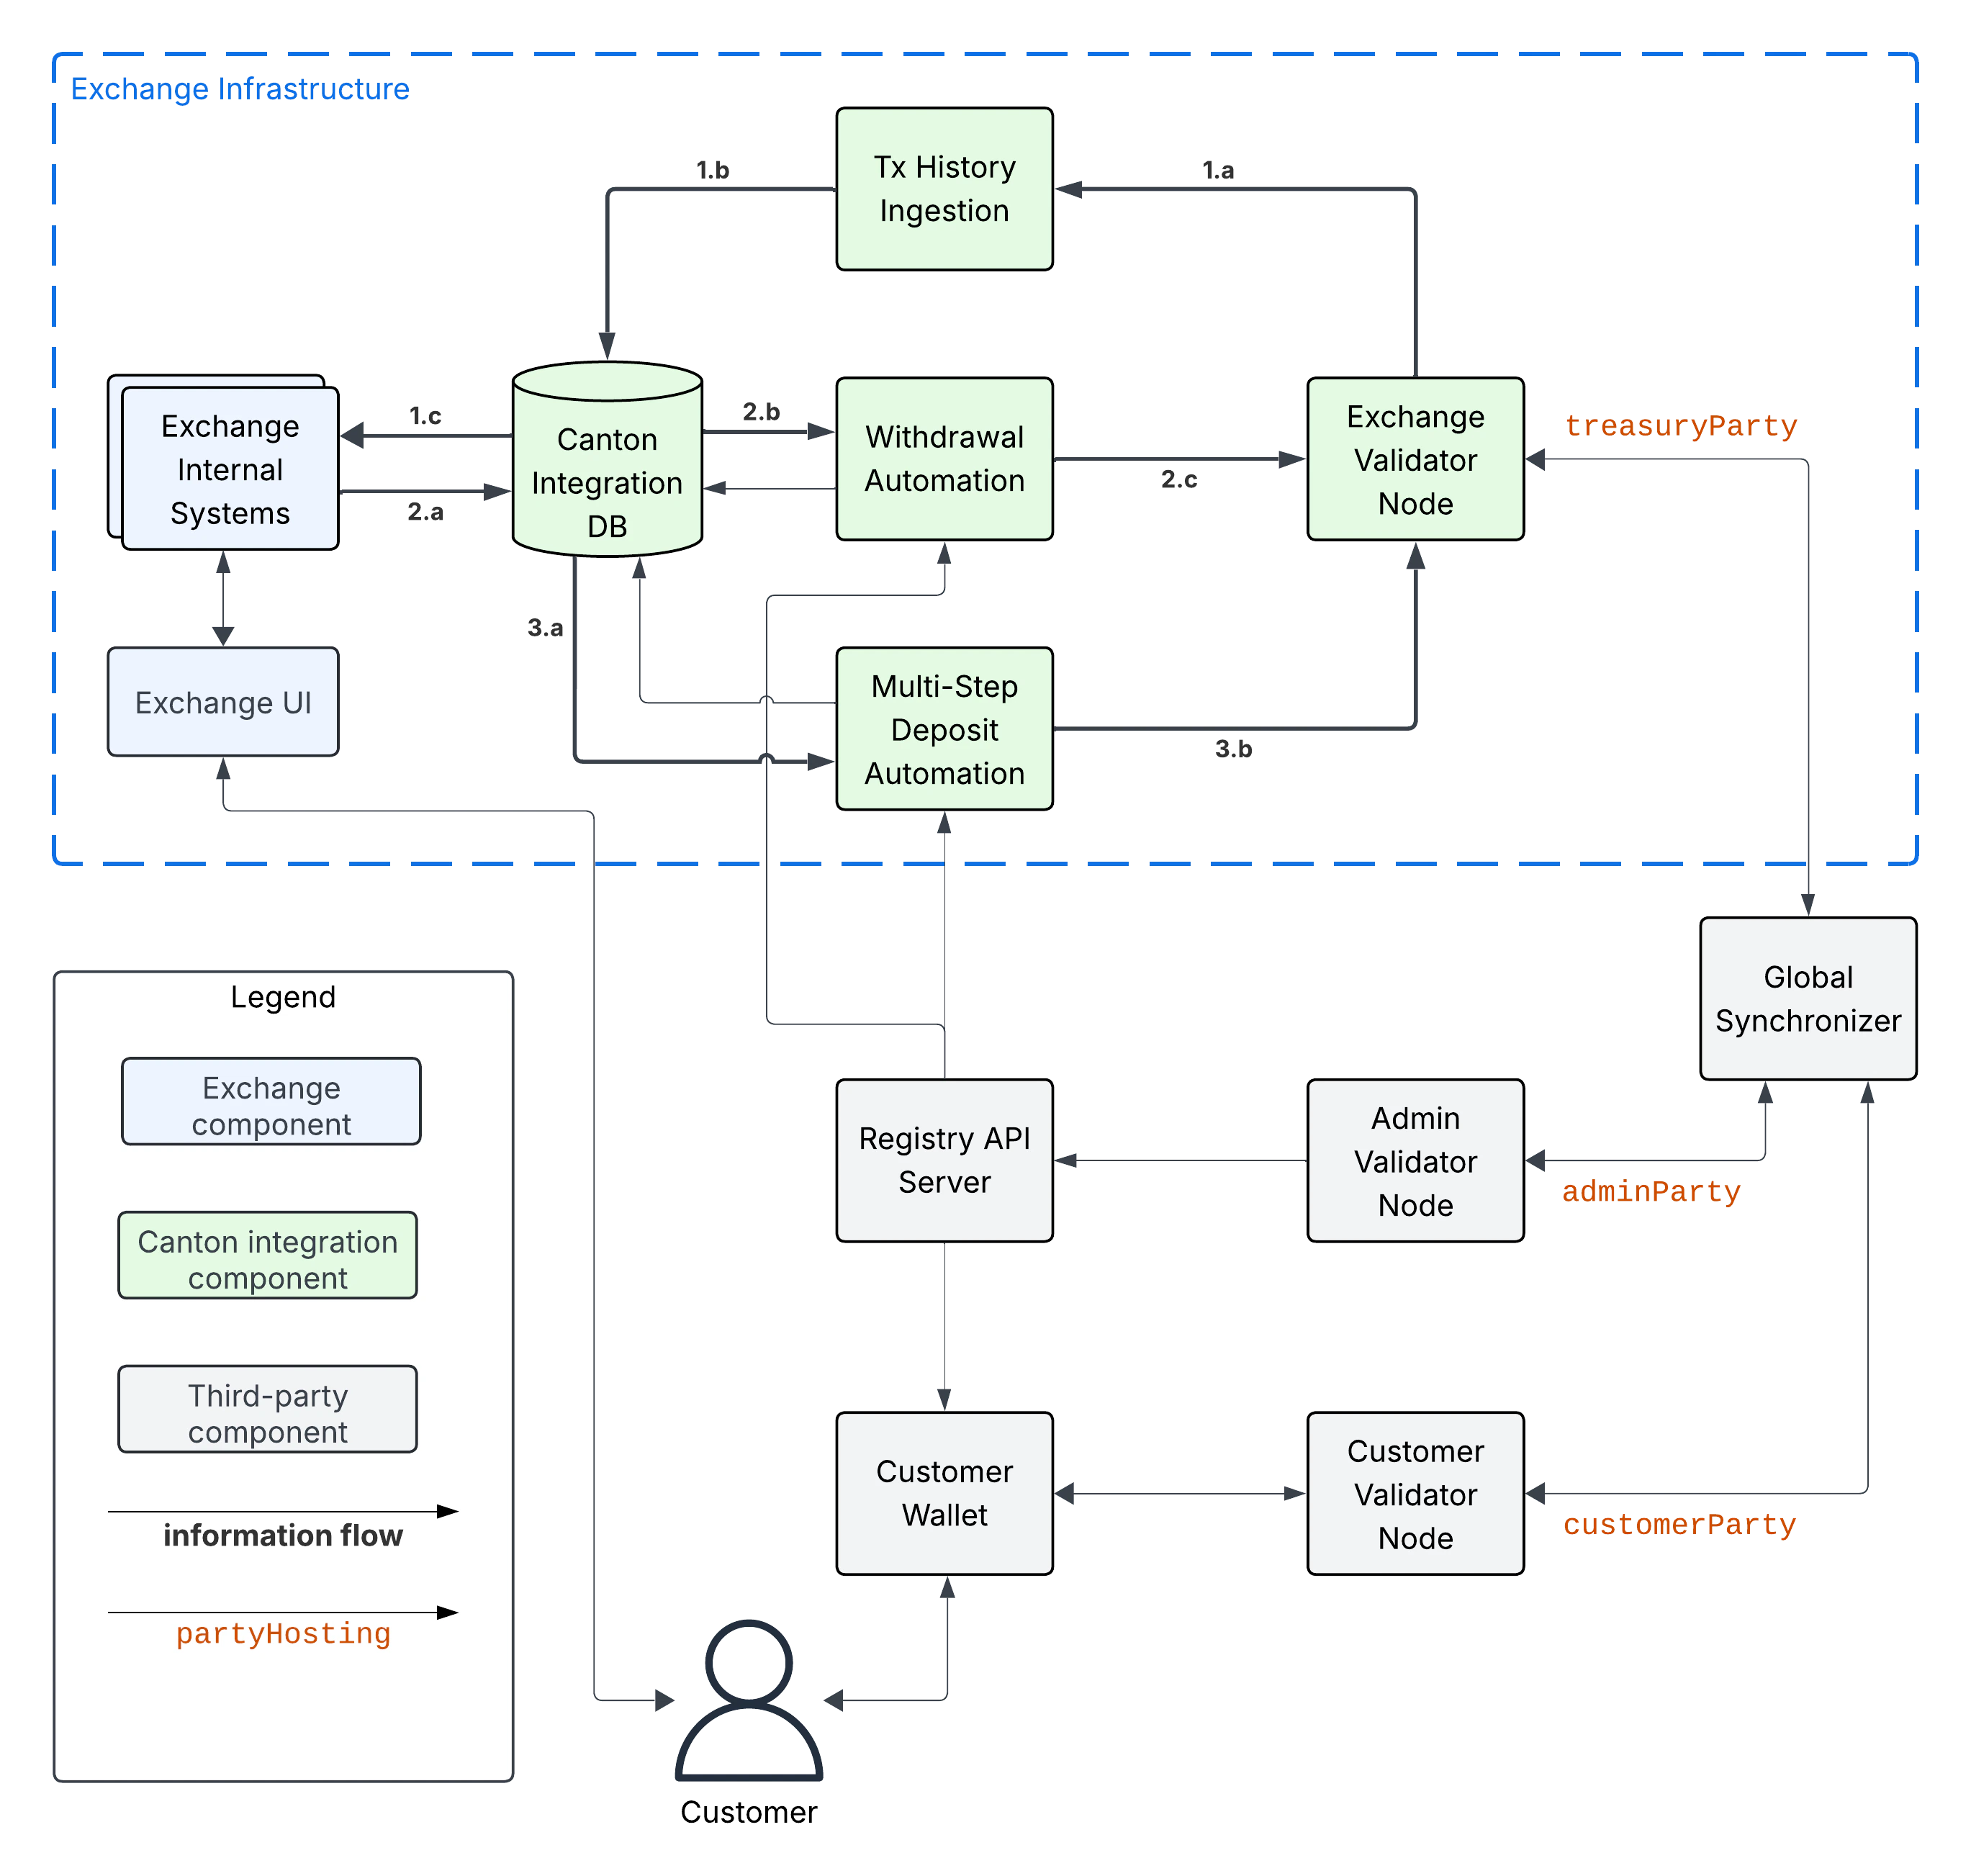
-
Tx History Ingestion: ingests the transactions (tx) affecting the
treasuryPartyfrom the Exchange Validator Node into the Canton Integration DB. Arrow 1.a represents the transaction data being read using the/v2/updates/flatsLedger API endpoint using either plain HTTP or websockets. It is parsed by the Tx History Ingestion service to update the status of funds, deposits, and withdrawals in the Canton Integration DB (Arrow 1.b). This data is queried by Exchange Internal Systems (Arrow 1.c), for example to serve the Exchange UI. For brevity, the diagram shows direct access to the Canton Integration DB by the Exchange Internal Systems. However using a micro-services architecture, the Exchange Internal Systems would typically access the Canton Integration DB through a dedicated API layer. Choose whatever architecture best fits your exchange’s needs. - Withdrawal Automation: starts with the Exchange Internal Systems writing a withdrawal request to the Canton Integration DB (Arrow 2.a). The Withdrawal Automation service reads the request from the DB (Arrow 2.b), and prepares, signs, and executes a Canton Network Token standard transfer corresponding to the withdrawal request using the Ledger API (Arrow 2.c). Note that the status of transfers becomes visible in the transaction history ingested by the Tx History Ingestion service; and is communicated to both the Exchange Internal Systems and the Withdrawal Automation service via the Canton Integration DB. This routing of information through the Canton Integration DB is intentional to simplify disaster recovery. Note also that the Withdrawal Automation may write back to the Canton Integration DB to mark a withdrawal as failed.
- Multi-Step Deposit Automation: is required to support offer-and-accept style transfers for tokens that do not support direct transfers. It relies on the Tx Ingestion Service to ingest transfer offers as part of Arrow 1.c. The workflow starts with the Multi-Step Deposit Automation service querying the Canton Integration DB to see whether there are pending transfers for deposits from customers (Arrow 3.a). The service then checks whether the deposit address specified in the transfer is known. If yes, it prepares, signs, and executes an accept transaction using the Ledger API (Arrow 3.b). If no, then it takes no action, and lets the transfer offer expire or be withdrawn by the sender. Note that there is an arrow from Multi-Step Deposit Automation back to the Canton Integration DB, as the Multi-Step Deposit Automation may write back to the Canton Integration DB to store that the transaction to accept the deposit could not be committed even after retrying multiple times.
integration-workflows section.
Integration Workflows
Overview
The workflows below are grouped into two milestones.mvp-for-cccontains the minimum viable product (MVP) workflows for integrating Canton Coin (CC) into the exchange. It comes with the limitation that both the exchange and the customers need to set up aTransferPreapprovalcontract to enable 1-step transfers of CC.mvp-for-cn-tokenscontains the additional workflows required to support all CN tokens. They are the workflows to onboard a new token and to support multi-step transfers for both deposits and withdrawals. Multi-step transfers gives the receiver a choice to: reject an incoming transfer as well as enable additional asynchronous checks on transfers by the token admin (e.g. KYC/AML checks).
integration-extensions.
add these functions. potentially using sphinx-tabs to allow switching between SDK function view and higher-level description
MVP for Canton Coin
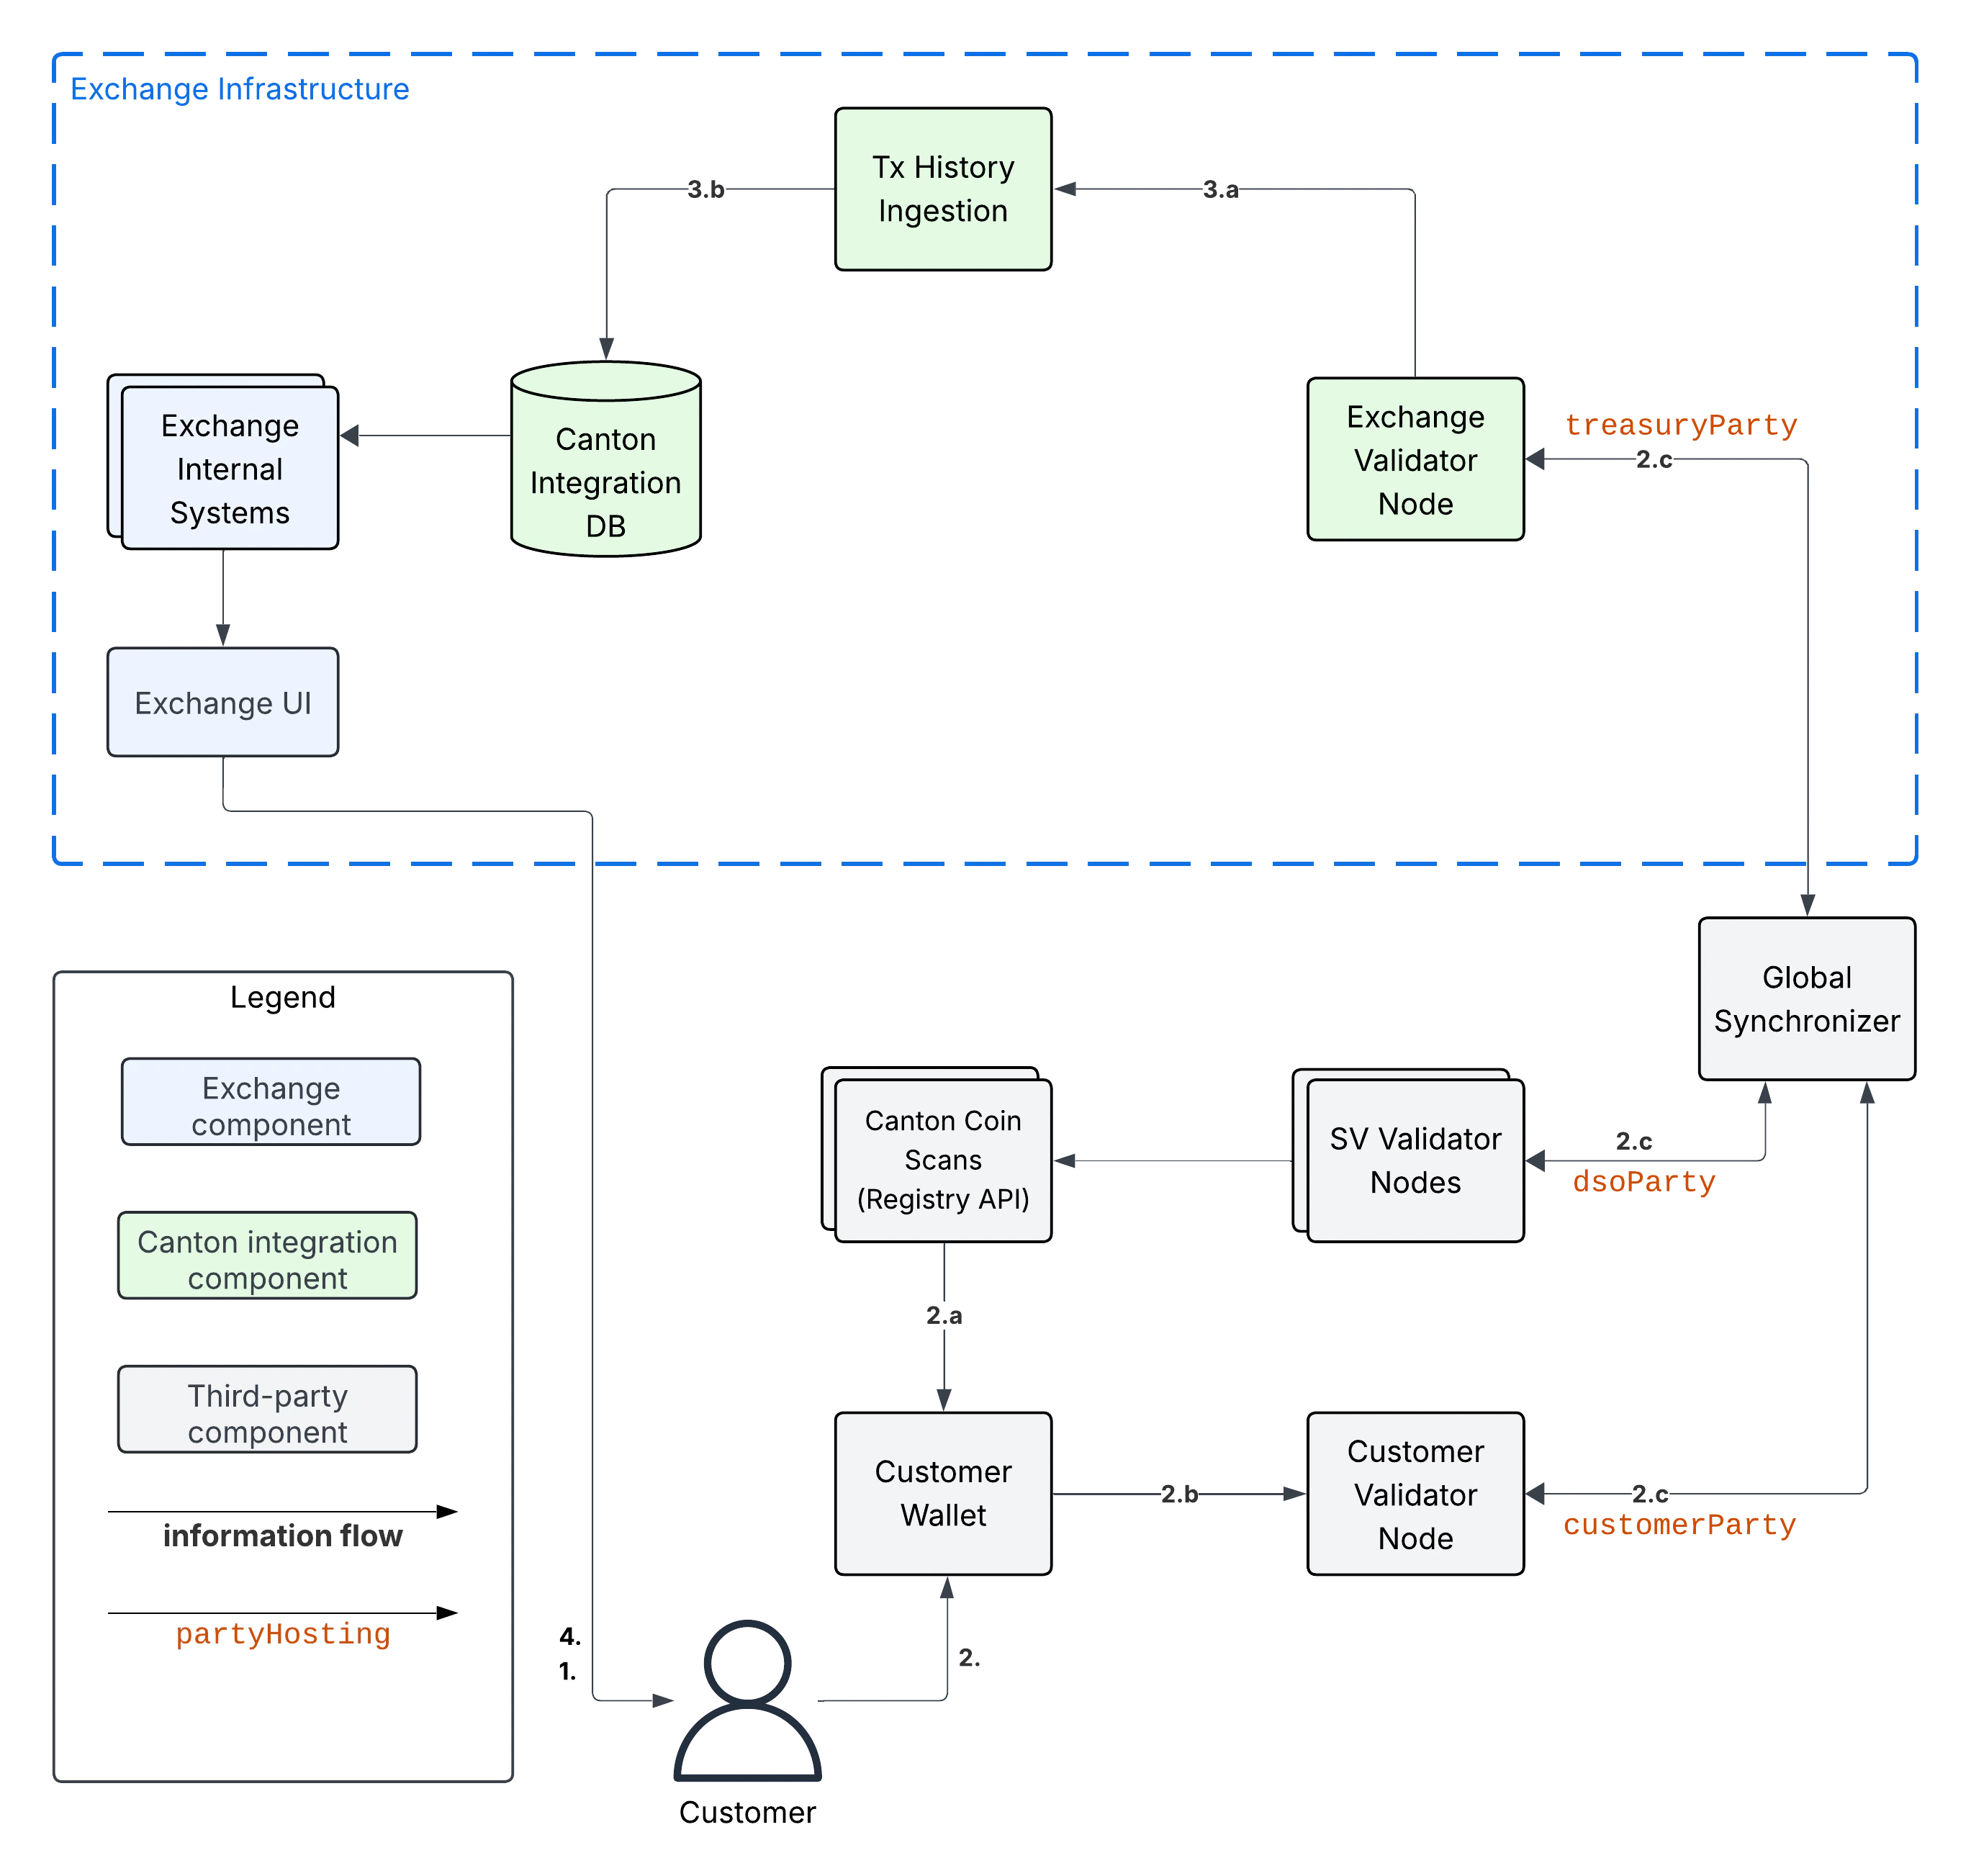
The diagrams in the sections below adapt the diagram from the
information-flows section to the Canton Coin workflow. The adaptations are:- The role of the
adminPartyis assumed by thedsoParty, which is the token admin party for CC. ThedsoPartyis a decentralized party that is hosted on the validator nodes run by Super Validator (SV) operators. A confirmation threshold of 2/3 is used to achieve Byzantine fault-tolerance for its transaction validation. - The role of the Registry API Server is taken over by the Canton Coin Scan services that every SV operator runs. They serve the Registry API for CC. See
reading-from-canton-coin-scanfor more information about how to reliably read from multiple Canton Coin Scan instances.
1-Step Deposit Workflow
- The Exchange has set up a CC
TransferPreapprovalfor theirtreasuryPartyas explained intreasury-party-setup. - The Exchange has associated deposit account “abc123” with the Customer in the Canton Integration DB.
- Customer uses Exchange UI to retrieve
treasuryPartyand the deposit account-id (“abc123”) to use for the deposit - Customer uses Customer Wallet to initiate a token standard transfer of 100 CC to
treasuryPartywith metadata keysplice.lfdecentralizedtrust.org/reasonset to “abc123”.-
Customer Wallet selects CC
HoldingUTXOs to fund the transfer and queries Canton Coin Scan to retrieve registry-specificTransferFactoryand extra transfer context. The returned data includes theTransferPreapprovalfor thetreasuryParty. -
Customer wallet submits the command to exercise the
TransferFactory_Transferchoice together with the extra transfer context. The resulting transaction:- archives the funding CC
HoldingUTXOs - creates a CC
HoldingUTXO with contract-idcoid234owned by thetreasuryParty - creates another CC
HoldingUTXO for the change owned by the Customer.
- archives the funding CC
-
The resulting transaction gets committed across the Customer, Exchange, and SV validator nodes. It is assigned an update-id
upd567and a record timet1by the Global Synchronizer. It is assigned offsetoff1by the Exchange Validator Node. (The other validator nodes will have a differentoffsetvalue.)
-
Customer Wallet selects CC
- Tx History Ingestion observes
upd567at record timet1with offsetoff1and updates the Canton Integration DB as follows.- Tx History Ingestion parses
upd567using the token standard tx history parser from the Wallet SDK to determine:- The deposit amount of 100 CC.
- The deposit account “abc123” from the
splice.lfdecentralizedtrust.org/reasonmetadata value. - The new
HoldingUTXOcoid234owned by thetreasuryParty
- Tx History ingestion writes the following in a single, atomic transaction to the Canton Integration DB
- The latest ingested update-id
upd567, its record timet1, its offsetoff1, and thesynchronizerIdof the Global Synchronizer. - The new CC
HoldingUTXOcoid234for the 100 CC that was received. - The credit of 100 CC on the Customer’s account at the exchange.
- The latest ingested update-id
- Tx History Ingestion parses
- Customer observes the successful deposit in their Exchange UI, whose data is retrieved from the Canton Integration DB via the Exchange Internal Systems.
1-Step Withdrawal Workflow
- Customer set up a CC
TransferPreapprovalfor theircustomerParty.
- Customer requests withdrawal of 100 CC to
customerPartyusing the Exchange UI. - Exchange Internal Systems process that request and update the Canton Integration DB to store:
- The deduction of 100 CC from the Customer’s trading account.
- The pending withdrawal with id
wid123of 100 CC tocustomerParty. - The CC
HoldingUTXOscoidsto use to fund the transfer tocustomerPartyforwid123. Seeutxo-managementfor more information. - The target record time
trecTgton the Global Synchronizer until which the transaction for the CC transfer must be committed. Thecoidsare considered to be reserved for funding the transfer for withdrawalwid123untiltrecTgthas passed.
- Withdrawal Automation queries the Canton Integration DB in a polling fashion, observes the pending withdrawal
wid123, and commits the corresponding CC transfer as follows.-
Withdrawal Automation queries Canton Coin Scan to retrieve the
TransferFactoryfor CC and extra transfer context. -
Withdrawal automation checks that transfer is indeed a 1-step transfer by checking that
transfer_kind="direct"in the response from Canton Coin Scan. If that is not the case, then it marks the withdrawal as failed in the Canton Integration DB with reason “lack of CC transfer-preapproval forcustomerParty” and stops processing. -
Withdrawal Automation prepares, signs, and submits the command to exercise the
TransferFactory_Transferchoice with the exclusive upper-bound for the record time of the commit set totrecTgt. It also sets the value for keysplice.lfdecentralizedtrust.org/reasonin theTransfermetadata towid123. -
The resulting transaction:
The transaction is committed across the Customer, Exchange, and SV validator nodes. It is assigned an update-id- archives the CC
HoldingUTXOscoidsused to fund the transfer - creates a CC
HoldingUTXO with contract-idcoid345owned by thecustomerParty - creates a CC
HoldingUTXO with contract-idcoid789owned bytreasuryPartyrepresenting the change returned to the Exchange.
upd567and a record timet1<trecTgtby the Global Synchronizer. It is assignedoff1by the Exchange Validator Node. It is assignedoff2by the Customer Validator Node. - archives the CC
-
Withdrawal Automation queries Canton Coin Scan to retrieve the
- Tx History Ingestion observes
upd567att1with offsetoff1and updates the Canton Integration DB as follows.- Tx History Ingestion parses
upd567using the token standard tx history parser from the Wallet SDK to determine:- The withdrawal-id
wid123from thesplice.lfdecentralizedtrust.org/reasonmetadata value. - The new
HoldingUTXOcoid789owned by thetreasuryParty
- The withdrawal-id
- Tx History ingestion writes the following in a single, atomic transaction to the Canton Integration DB
- The latest ingested update-id
upd567, its record timet1and offsetoff1. - The successful completion of withdrawal
wid123by the transaction with update-idupd567at record timet1. - The deduction of 100 CC from the Customer’s trading account.
- The archival of the CC
HoldingUTXOscoids. - The new CC
HoldingUTXOcoid789for the change returned after funding the CC transfer.
- The latest ingested update-id
- Tx History Ingestion parses
- Customer Wallet observes
upd567att1with offsetoff2on the Customer Validator Node, parses it using the token standard tx history parser and updates its UI as follows:- Its tx history shows the receipt of 100 CC from
exchangePartywith “Reason”wid123that was committed as updateupd567att1. - Its holding listing shows the new CC
Holdingwith contract idcoid345.
- Its tx history shows the receipt of 100 CC from
- Customer observes the completion of the withdrawal at
t1in the Exchange UI and the receipt of the expected funds in their Customer Wallet.
UTXO Selection and Management
Executing a withdrawal requires selectingHolding UTXOs to fund the withdrawal, as described for example in one-step-withdrawal-workflow. You likely already have a UTXO management strategy in place for your existing UTXO-chain integrations. Here some considerations to take into account when adapting your strategy to work with Canton:
- Canton Coin charges a small holding fee of about $1 per year for each
HoldingUTXO to allow archiving dust coins once their holding fee surpasses their value. - Canton Coin limits the number of UTXOs for a single transfer to 100
HoldingUTXOs to avoid large transactions that are expensive to process. - Canton Coin transactions also merge all input
HoldingUTXOs and return the change to the sender as a singleHoldingUTXO to allow batching the merging ofHoldingUTXOs with transfers. - Other tokens are likely to follow similar strategies for the same rationale.
- At the time of writing (2025-08-29), the Canton Network Token Standard recommends to use self-transfers (i.e.,
sender=receiver) to be used to mergeHoldingUTXOs into twoHoldingUTXOs: one for the transferredamountand another one for the change. It does not (yet) support requesting multipleHoldingUTXOs to be created for the change.
- Limit the number of input UTXOs to less than 100 UTXOs per transfer. Thus staying with the Canton Coin limits and keeping transaction size small, which also helps you to reduce your traffic spend when having to retry transaction execution.
- Consider using a UTXO selection strategy for withdrawals that favors smaller UTXOs so that they get merged automatically as part of executing transfers.
- Consider keeping a pool of
klarge amount UTXOs to be able to execute up tokwithdrawals at the same time. Run a periodic background job to manage this pool using self-transfers.- From an implementation perspective, these self-transfers are a special kind of withdrawal. We thus recommend to implement them using the same code path as withdrawals: start with writing the self-transfer request into the Canton Integration DB and have the Withdrawal Automation execute it.
MVP for all Canton Network Tokens
The MVP for supporting all Canton Network tokens builds on the MVP for Canton Coin. The key changes required are:- Change Tx History Ingestion to also ingest the
TransferInstructionUTXOs, which are used by the Canton Network Token Standard to represent in-progress transfers (see docs, code). - Adjust the Exchange UI to show the status of in-progress transfers.
- Adjust the user funds tracking done as part of Tx History Ingestion to credit funds back to the user if they reject a withdrawal transfer. Consider deducting a fee for the failed withdrawal.
- Implement the Multi-Step Deposit Automation service to auto-accept incoming transfers that are pending receiver acceptance. Ensure that the deposit address is known before accepting the transfer.
- Add support for configuring the URL of a token admin’s Registry API Server and to deploy their .dar files as described in
token-onboarding.
- There is a token admin called Acme who issues a token called AcmeToken on the Canton Network and operates their own Admin Validator Node and their own Registry API Server.
- The Exchange and Customer have onboarded AcmeToken as per
token-onboarding.
Multi-Step Deposit Workflow
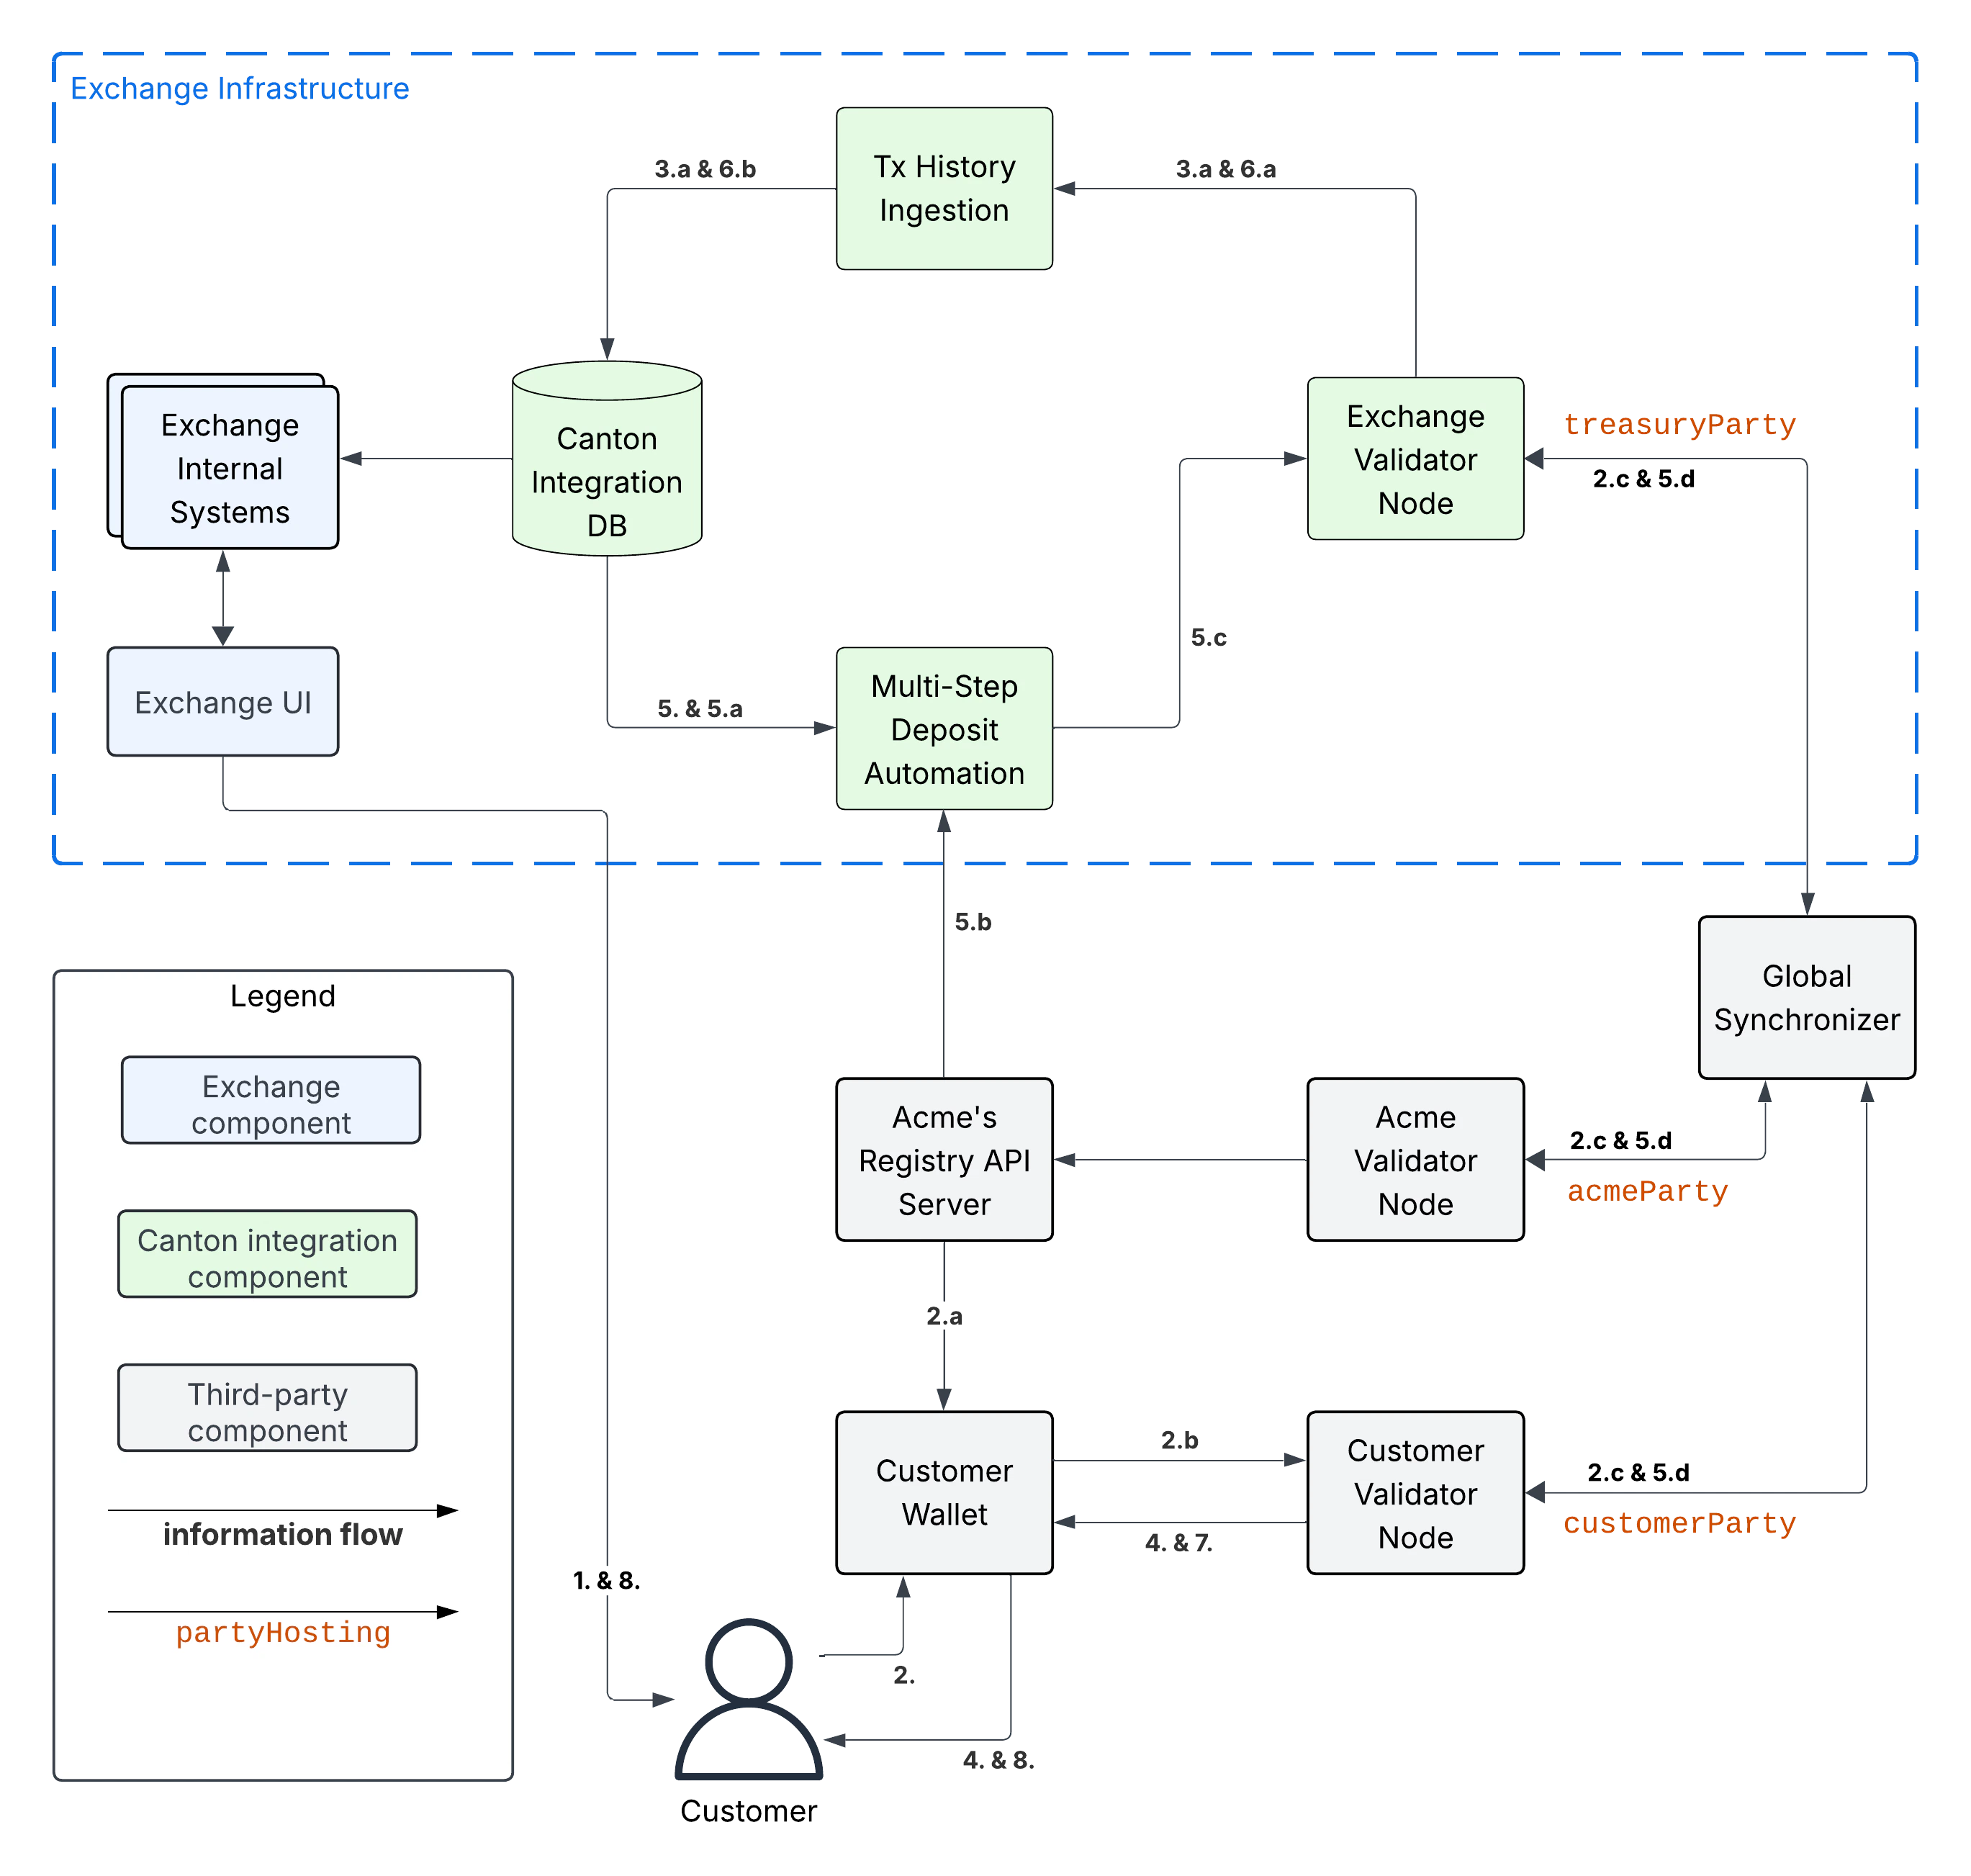
Example flow: deposit offer and acceptance
The flow uses essentially the same initial four steps as theone-step-deposit-workflow above. We list them in full for completeness.
- Customer uses Exchange UI to retrieve
treasuryPartyand deposit account-id “abc123” to use for the deposit. - Customer uses Customer Wallet to initiate a token standard transfer of 100 AcmeToken to
treasuryPartywith metadata keysplice.lfdecentralizedtrust.org/reasonset to “abc123”.-
Customer Wallet selects AcmeToken
HoldingUTXOs to fund the transfer and queries Acme’s Registry API Server to retrieve registry-specificTransferFactoryand extra transfer context. The URL for this server was configured in the Customer Wallet as part oftoken-onboarding. -
Customer wallet submits the command to exercise the
TransferFactory_Transferchoice together with the extra transfer context. The resulting transaction:
The transaction also creates a- archives the funding AcmeToken
HoldingUTXOs - creates a locked 100 AcmeToken
HoldingUTXO with contract-idcoid234owned by thecustomerParty - creates another AcmeToken
HoldingUTXO for the change owned by the Customer.
TransferInstructionUTXO with contract-idcoid567, which represents the transfer offer to the Exchange. - archives the funding AcmeToken
-
The resulting transaction gets committed across the Customer, Exchange, and Acme validator nodes. It is assigned an update-id
upd567and a record timet1by the Global Synchronizer. It is assigned offsetoff1by the Exchange Validator Node.
-
Customer Wallet selects AcmeToken
- Tx History Ingestion observes
upd567att1with offsetoff1and updates the Canton Integration DB as follows.- Tx History Ingestion parses
upd567using the token standard tx history parser from the Wallet SDK to determine:- The deposit amount of 100 AcmeToken.
- The deposit account “abc123” from the
splice.lfdecentralizedtrust.org/reasonmetadata value. - The
TransferInstructionUTXOcoid567representing the transfer offer for the deposit.
- Tx History ingestion writes the following in a single, atomic transaction to the Canton Integration DB
- The latest ingested update-id
upd567its record timet1and offsetoff1. - The
TransferInstructionUTXOcoid567representing the transfer offer fromcustomerPartyfor a deposit of 100 AcmeToken in account “abc123”.
- The latest ingested update-id
- Tx History Ingestion parses
- Customer Wallet ingests update
upd567and Customer observes the pending transfer offer for the deposit in the Customer Wallet. Customer also sees the 100 AcmeTokenHoldingUTXOcoid234locked to the deposit.
one-step-deposit-workflow starts. The Multi-Step Deposit Automation service will now auto-accept the transfer offer.
-
The Multi-Step Deposit Automation regularly queries the Canton Integration DB for pending transfer offers for known deposit accounts. It thus observes the pending transfer offer
coid567and accepts it as follows.- Multi-Step Deposit Automation retrieves the URL for Acme’s Registry API Server from the Canton Integration DB.
- Multi-Step Deposit Automation queries Acme’s Registry API Server to retrieve the extra context to exercise the
TransferInstruction_Acceptchoice oncoid567. - Multi-Step Deposit Automation prepares, signs, and submits the command to exercise the
TransferInstruction_Acceptchoice oncoid567. - The resulting transaction gets committed across the Customer, Exchange, and Acme validator nodes. It is assigned an update-id
upd789and a record timet2the Global Synchronizer. It is assignedoff3by the Exchange Validator Node. The resulting transaction has the following effects:- It archives the
TransferInstructionUTXOcoid567. - It archives the locked 100 AcmeToken
HoldingUTXOcoid234owned by thecustomerParty. - It creates a 100 AcmeToken
HoldingUTXOcoid999owned by thetreasuryParty.
- It archives the
one-step-deposit-workflow.
- Tx History Ingestion observes
upd789att2with offsetoff3and updates the Canton Integration DB as follows.- Tx History Ingestion parses
upd789using the token standard tx history parser from the Wallet SDK to determine:- The deposit amount of 100 AcmeToken.
- The deposit account “abc123” from the
splice.lfdecentralizedtrust.org/reasonmetadata value.
- Tx History ingestion writes the following in a single, atomic transaction to the Canton Integration DB
- The latest ingested update-id
upd789, its record timet2and offsetoff3. - The new AcmeToken
HoldingUTXOcoid999for the 100 AcmeToken that was received. - The credit of 100 AcmeToken on the Customer’s account at the exchange.
- The latest ingested update-id
- Tx History Ingestion parses
- Customer Wallet observes
upd789att2on the Customer Validator Node, parses it using the token standard tx history parser and updates its UI as follows:- Its tx history shows the successful transfer of 100 AcmeToken to
exchangePartywith “Reason”wid123that was committed as updateupd789att2.
- Its tx history shows the successful transfer of 100 AcmeToken to
- Customer observes the successful deposit in their Exchange UI, whose data is retrieved from the Canton Integration DB via the Exchange Internal Systems.
Example: handling deposits with unknown deposit accounts
To minimize traffic cost, we recommend not acting on deposits with unknown deposit accounts. The sender can use their wallet to withdraw the offer. Ingesting deposit offers with unknown deposit accounts is still valuable to allow the exchange’s support team to handle customer inquiries about these transfers.Multi-Step Withdrawal Workflow
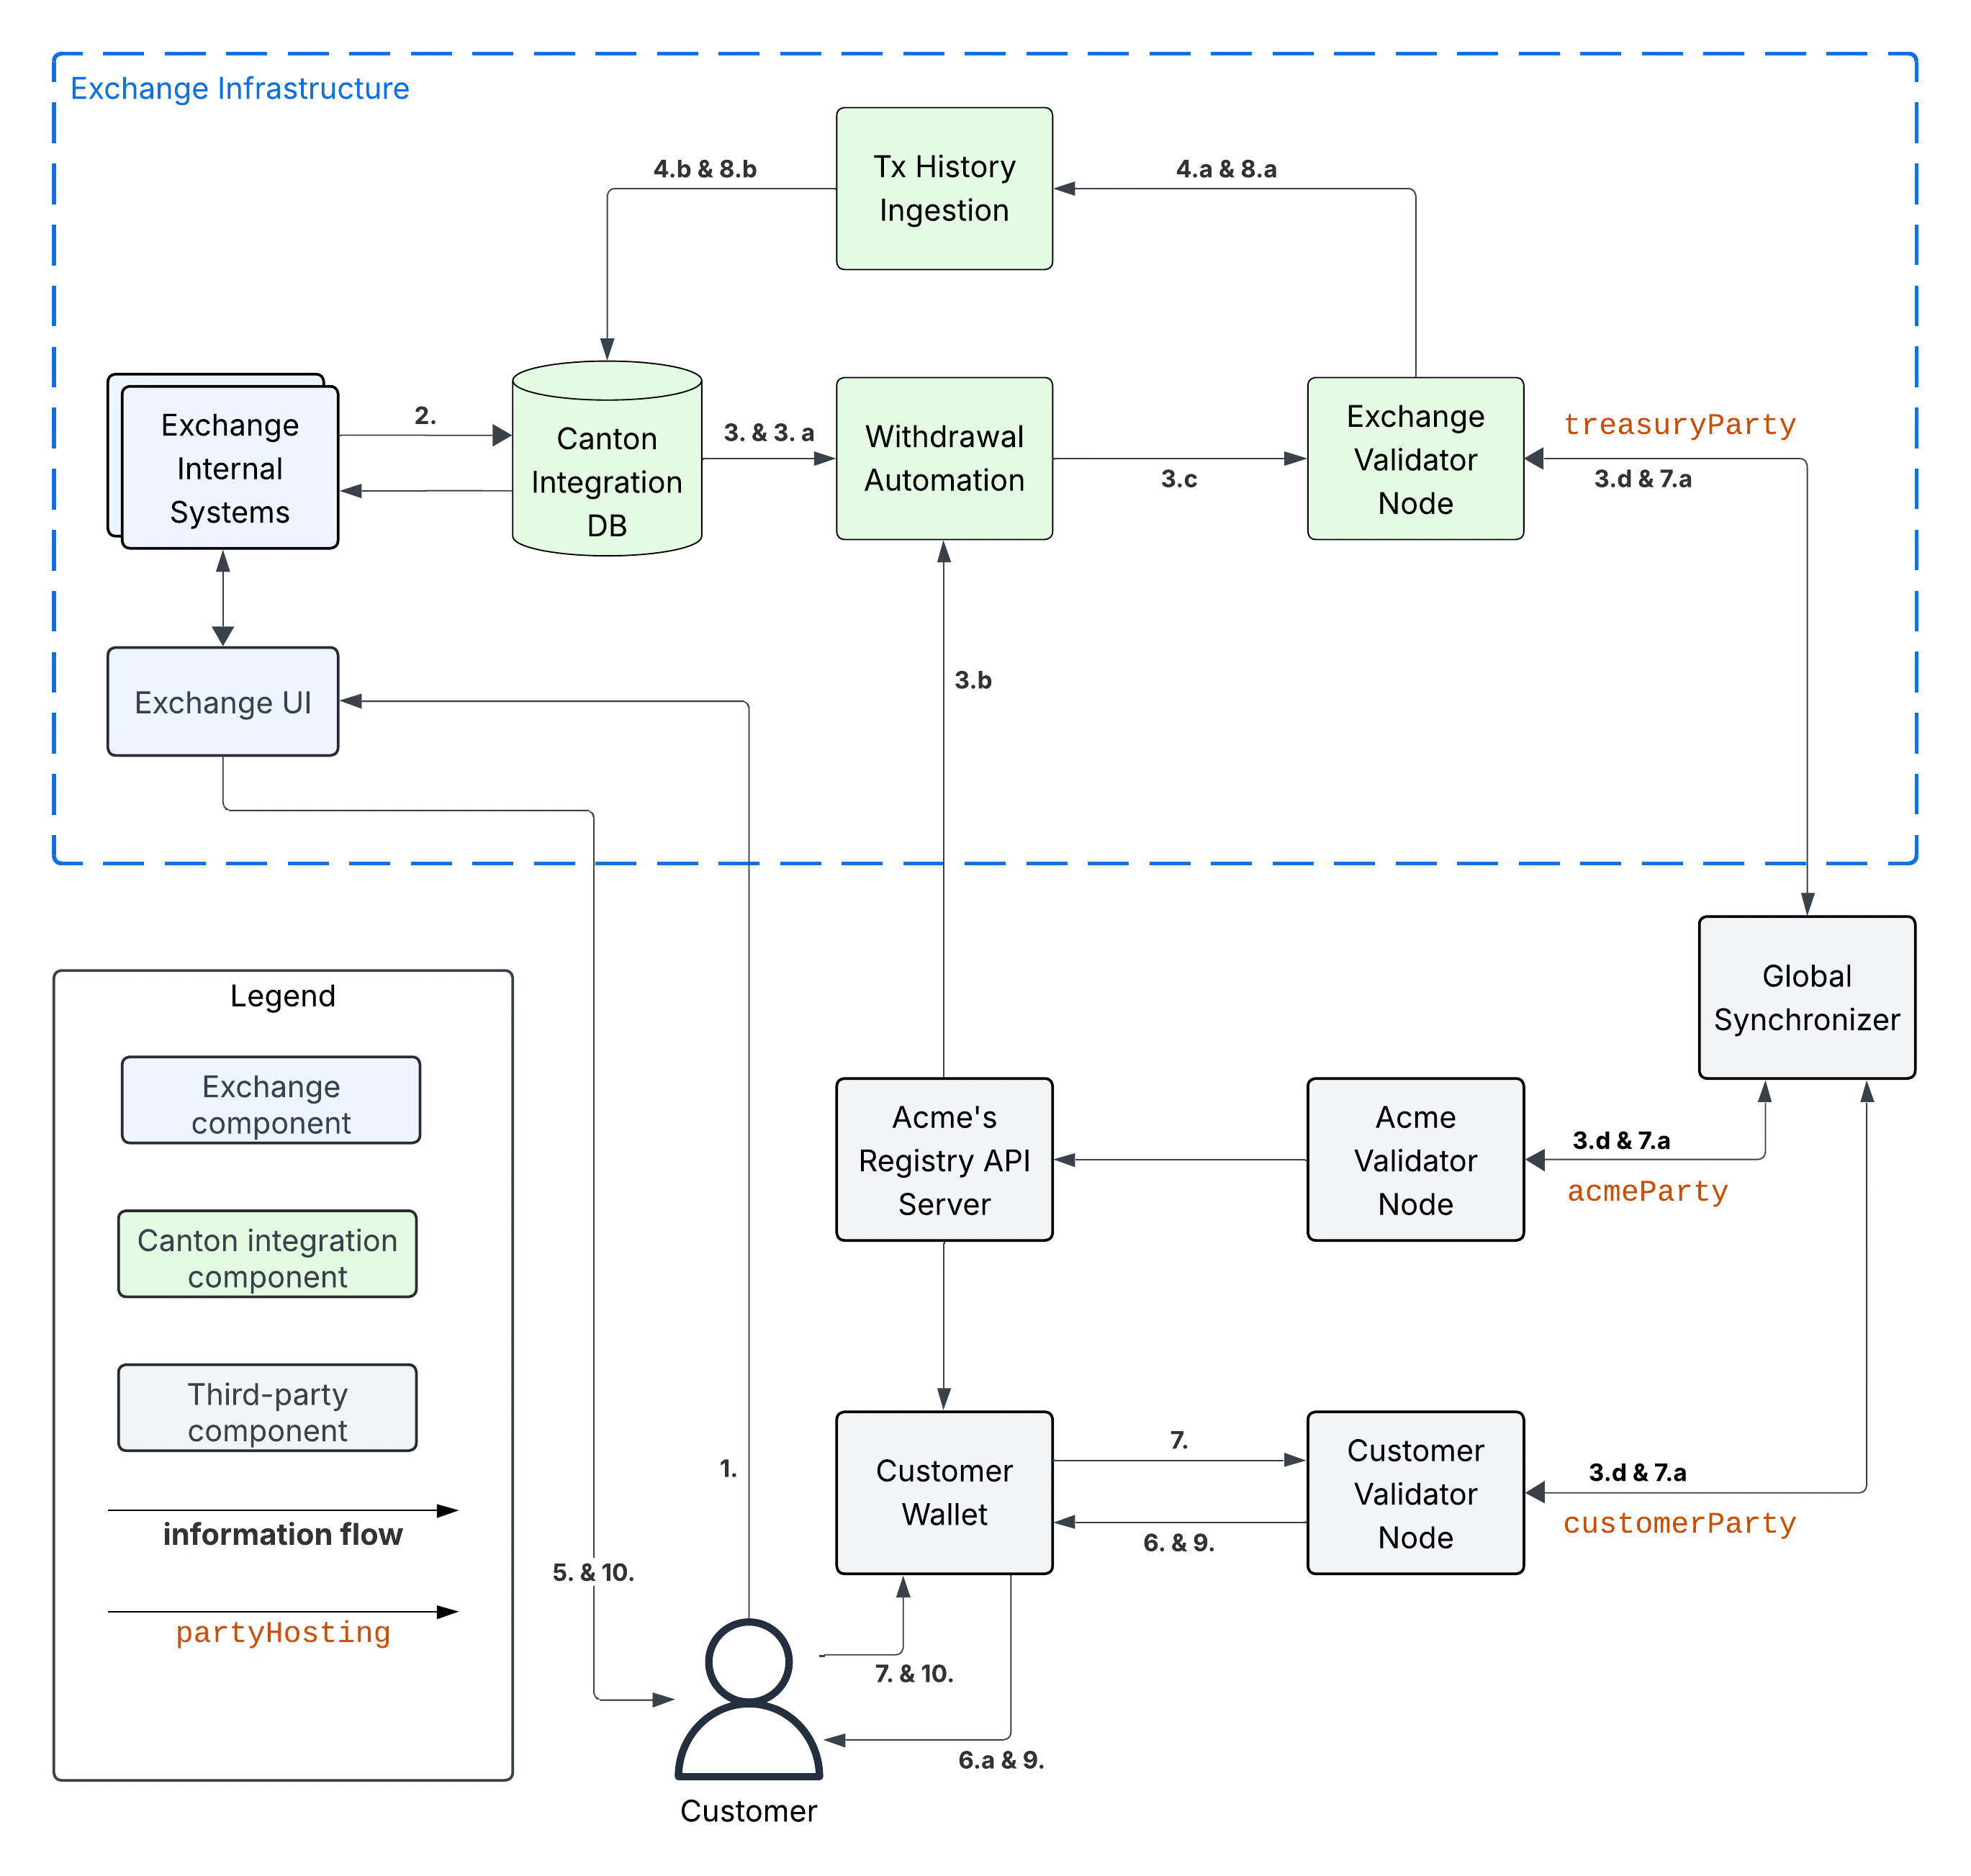
Example flow: withdrawal offer and acceptance
The flow uses essentially the same initial six steps as theone-step-withdrawal-workflow above. We list them in full for completeness.
- Customer requests withdrawal of 100 AcmeToken to
customerPartyusing the Exchange UI. - Exchange Internal Systems process that request and update the Canton Integration DB to store:
- The deduction of 100 AcmeToken from the Customer’s trading account.
- The pending withdrawal with id
wid123of 100 AcmeToken tocustomerParty. - The AcmeToken
HoldingUTXOscoidsto use to fund the transfer tocustomerPartyforwid123. Seeutxo-managementfor more information. - The target record time
trecTgton the Global Synchronizer until which the transaction for the AcmeToken transfer must be committed using thecoidsUTXOs for fundingwid123. Thecoidsare considered to be reserved to funding this transfer untiltrecTgthas passed.
- Withdrawal Automation queries the Canton Integration DB in a polling fashion, observes the pending withdrawal
wid123, and commits the corresponding AcmeToken transfer as follows.- Withdrawal Automation retrieves the URL for Acme’s Registry API Server from the Canton Integration DB.
- Withdrawal Automation queries Acme’s Registry API Server to retrieve the
TransferFactoryfor AcmeToken and extra transfer context. - Withdrawal Automation prepares, signs, and submits the command to exercise the
TransferFactory_Transferchoice with the exclusive upper-bound for the record time of the commit set totrecTgt. It also sets the value for keysplice.lfdecentralizedtrust.org/reasonin theTransfermetadata towid123; and it sets the upper bound for the customer to accept the transfer far enough in the future, so that the customer has sufficient time to act (e.g. 1 year). - The resulting transaction gets committed across the Customer, Exchange, and Acme validator nodes. It is assigned an update-id
upd567and a record timet1<trecTgtby the Global Synchronizer. It is assignedoff1by the Exchange Validator Node. It is assignedoff2by the Customer Validator Node. The resulting transaction has the following effects:- It archives the AcmeToken
HoldingUTXOscoidsused to fund the transfer. - It creates an AcmeToken
HoldingUTXO with contract-idcoid789owned bytreasuryPartyrepresenting the change returned to the Exchange. - It creates one locked AcmeToken
HoldingUTXO with amount 100 and contract-idcoid345owned by thetreasuryParty. - It creates a
TransferInstructionUTXO with contract-idcoid567representing the transfer offer. ThisTransferInstructionincludes a copy of theTransferspecification and its metadata.
- It archives the AcmeToken
- Tx History Ingestion observes
upd567att1with offsetoff1and updates the Canton Integration DB as follows.- Tx History Ingestion parses
upd567using the token standard tx history parser from the Wallet SDK to determine:- The withdrawal-id
wid123from thesplice.lfdecentralizedtrust.org/reasonmetadata value. - The new locked AcmeToken
HoldingUTXOcoid345owned by thetreasuryPartyand locked to the withdrawalwid123of 100 AcmeToken tocustomerParty. - The new AcmeToken
HoldingUTXOcoid789owned by thetreasuryParty - The
TransferInstructionUTXOcoid567representing the transfer offer for the withdrawal.
- The withdrawal-id
- Tx History ingestion writes the following in a single, atomic transaction to the Canton Integration DB:
- The latest ingested update-id
upd567, its record timet1and offsetoff1. - The successful transfer offer for withdrawal
wid123by the transaction with update-idupd567at record timet1. - The
HoldingUTXOcoid345locked to the withdrawal. - The
TransferInstructionUTXOcoid567representing the transfer offer. - The archival of the AcmeToken
HoldingUTXOscoids. - The new AcmeToken
HoldingUTXOcoid789for the change returned after funding the AcmeToken transfer.
- The latest ingested update-id
- Tx History Ingestion parses
- Exchange UI displays that withdrawal
wid123is pending transfer offer acceptance by the Customer. - Customer Wallet observes update with update-id
upd567att1with offsetoff2on the Customer Validator Node.- It parses the transaction using the token standard transaction history parser and updates its UI so that its transaction history shows the offer for a transfer of 100 AcmeToken from
exchangePartywith “Reason”wid123that was committed as updateupd567att1.
- It parses the transaction using the token standard transaction history parser and updates its UI so that its transaction history shows the offer for a transfer of 100 AcmeToken from
one-step-withdrawal-workflow starts. The customer has a choice whether to accept or reject the transfer offer. Here they choose to accept it.
- Customer uses their Customer Wallet to accept the offer using the
TransferInstruction_Acceptchoice.- The resulting transaction is committed across Exchange, Acme, and Customer validator nodes and assigned update-id
upd789and record timet2. The transaction has the following effects:- It archives the locked
HoldingUTXOcoid345. - It archives the
TransferInstructionUTXOcoid567. - It creates a 100 AcmeToken
HoldingUTXOcoid999owned by thecustomerParty.
- It archives the locked
- The resulting transaction is committed across Exchange, Acme, and Customer validator nodes and assigned update-id
- Tx History Ingestion observes update
upd789att2and offsetoff3assigned by the Exchange Validator Node.- It parses the update using the token standard parser to extract the withdrawal-id
wid123from thesplice.lfdecentralizedtrust.org/reasonmetadata value. - Tx History Ingestion writes the following in a single, atomic transaction to the Canton Integration DB
- The latest ingested update-id
upd789, its record timet2and offsetoff3. - The successful completion of the withdrawal
wid123by the transaction with update-idupd789at record timet2. - The archival of the locked AcmeToken
HoldingUTXOcoid345.
- The latest ingested update-id
- It parses the update using the token standard parser to extract the withdrawal-id
- Customer Wallet observes
upd789att2and updates its display to reflect its effects. - Customer observes the completion of the withdrawal at
t2in Exchange UI and confirms the receipt of funds in their Customer Wallet.
Example flow: customer rejects transfer offer
The Customer might decide to reject the offer in Step 7 in the example above. The corresponding transaction willSteps 8 - 10 are largely the same as for the successful acceptance with the difference that Tx History Ingestion will see this transaction and update the Canton Integration DB to such that
- archive the locked
HoldingUTXOcoid345,- archive the
TransferInstructionUTXOcoid567, and- create a new 100 AcmeToken
HoldingUTXOcoid999owned by thetreasuryParty.
And the user will ultimately see in both the Exchange UI and the Customer Wallet that the transfer was offered, but rejected by them.
- withdrawal
wid123is marked as failed because the customer rejected the offer, and- the customer account is credited back the 100 AcmeToken, potentially minus a fee for the failed withdrawal.
In most cases a
TransferInstruction will be completed in a single extra step: the receiver either accepts or rejects the transfer, or the sender withdraws it. Each of these steps will manifest as one of the choices on the TransferInstruction interface (code) and its TransferInstructionResult.output value clearly tells whether the instruction completed with a successful transfer, failed, or is still pending an action by one of the stakeholders.Canton Network Token Onboarding
You likely have requirements and considerations for onboarding a token. In the following, we document the additional considerations that are specific to Canton. At a high-level, the Canton-specific steps to onboarding a token are:- Upload the token admin’s .dar files to your validator node.
- Store the mapping from the token admin’s
adminPartyid to the admin’s Registry API Server URL in your Canton Integration DB (or another suitable place). - In case the token is permissioned, follow the token admin’s instructions to have your exchange’s
treasuryPartyadded to the token’s allowlist.
dsoParty ids. You can retrieve the dsoParty id for each network using the CC Scan API served from the SV nodes of that network:
- Use /v0/dso to query the
dsoPartyfor the network you are connected to. - Use /v0/splice-instance-names to query the network name (DevNet, TestNet, or MainNet).
Transaction History Ingestion Details
Offset Checkpoints
When consuming transactions through the update service at/v2/updates you will not just receive transactions but you will also receive offset checkpoints. Each offset checkpoint contains an offset and the most recent observed record time for each synchronizer. Your Tx History Ingestion should use that to update the last processed offset and record time (in addition to updating those after each transaction) so that it will resume processing transactions from that point on after a crash or restart.
Offset checkpoints are in particular required around Major Splice Upgrades where there is no Daml transaction for an extended period of time, but you want to ensure that your Tx History Ingestion advances beyond a particular record time.
Transaction Parsing
As part of theintegration-workflows, Tx History Ingestion is expected to extract a number of fields for both deposits and withdrawals. Below we provide details on the transaction structure of the integration-workflows and how to parse it.
The following code is available to help you implement your own parsing logic:
- JavaScript/TypeScript: use the token standard history parser provided in the wallet SDK.
- Java/JVM: use the the Java TransactionParser from the https://github.com/digital-asset/ex-java-json-api-bindings repository as a blueprint.
- Other languages: use the Java TransactionParser referenced above as a blueprint.
1-Step Transfers
To understand the structure of a 1-step transfer, let’s look at an example deposit as seen through the JSON Ledger API. In this case, we query a single transaction. The format is identical to the transaction you will get when streaming transactions through/v2/updates/flats and you can also use the same filter. Note that you need to adjust the auth-token, update-id and treasury-party placeholders to match your setup.
-
Go over the list of events ordered by
nodeIdthat you see in the transaction. -
For each exercised event, check the exercise result. If it has a field called
`metawith a"splice.lfdecentralizedtrust.org/tx-kind": "transfer"field you found a transfer. In the example here, this is the event withnodeId4 which exercises theTransferPreapproval_Sendchoice. Note that this choice is specific to Canton Coin so rely on the existence of themetafield which is standardized instead of the specific choice name. -
Extract the
"splice.lfdecentralizedtrust.org/reason"to get the deposit account. In this example it isdeposit-account-id. -
Go over all events whose
nodeIdis larger than thenodeIdof the transfer (4 in the example here) and smaller than thelastDescendantNodeIdof the transfer (12 in the example here). -
Find all
CreatedEventsin that range that create aHoldingwith"owner": "<treasury-party>"and sum up the amounts for eachinstrumentId. In this example, we have two events that create holdings,nodeId11 and 12. However, only 12 has"owner": "<treasury-party>". Therefore, we extract that the transfer created200.0000000000for the token with instrument id{"admin": "DSO::12204b8b621ec1dedd51ee2510085f8164cad194953496494d32f541f3f2c170e962", "id": "Amulet"}. -
Find all
ExercisedEventswithimplementedInterfacescontaining theHoldinginterface andconsuming: true. In the example here, this is the event withnodeId:: 8. For each of them get thecontractIdand lookup the contract payload through the event query service as shown below. If you get a 404, it’s a holding for a different party so you can ignore it. If you get back an event, check if"owner": "<treasury-party>". If so, sum up all events for which this is the case. In the example here, we get a 404 as it is a holding of the sender not treasury-party. -
Subtract the sum of archived holdings for the treasury-party from the sum of created holdings. This gives you the deposit amount for each instrument id. You now extracted the deposit amount from the created and exercised events, the UTXOs from the created events and the deposit acount from the
splice.lfdecentralizedtrust.org/reasonfield. -
Continue with the events starting at node id
lastDescendantNodeId + 1. Note that in this example this skips over the event withnodeId: 5which exercisesAmuletRules_Transfer. This is important as you already accounted for this event through the parent event at node id 4. Note that one transaction can contain multiple deposits including mixing 1 and 2-step deposits in the same transaction.
Differences between 1-Step Deposits and Withdrawals
The example we discussed above, shows a deposit. A withdrawal is essentially the same transaction but sender and receiver are swapped. For a withdrawal, the sender, i.e. the treasury party for an exchange, will also see theTransferFactory_Transfer choice as a parent and you can extract the amount and reason from that instead of looking for the meta field in exercise results.
Note however, that for Canton Coin the amount in the TransferFactory_Transfer argument will be higher than the difference of holdings archived and created for the treasury party due to Canton Coin usage fees. Once the CIP for CC fee removal is implemented, this distinction goes away. Currently Canton Coin is the only token on Canton Network charging such fees.
Multi-Step Transfers
To understand the transaction structure of a multi-step transfer, let’s look at an example transaction of a Multi-Step Deposit as seen through the JSON Ledger API. In this case, we query a single transaction. The format is identical to the transaction you will get when streaming transactions through/v2/updates/flats and you can also use the same filter. Note that you need to adjust the auth-token, update-id and treasury-party placeholders to match your setup.
- Go over the list of events ordered by
nodeIdthat you see in the transaction. - Look for all
CreatedEventsof theTransferInstructioninterface with"receiver": "<treasury-party>". Each of these represents a deposit offer that can be accepted or rejected. In the example this is only one event with node id0. Extract theinstrument, theamountand thesplice.lfdecentralizedtrust.org/reasonfield from theinterfaceViewand the contract id of theTransferInstruction. Note that one transaction can contain multiple deposits including mixing 1 and 2-step deposits in the same transaction.
-
Go over the list of events ordered by
nodeIdthat you see in the transaction. -
Look for exercises of the
TransferInstruction_Acceptchoice on theTransferInstructioninterface. In the example, this is the event with node id0. For each of those, extract the contract id. You can then query the event query service using:If you get a 404, the instruction is not for your treasury party so you can ignore it. If you get back an event, it has the same structure that we’ve seen above when a transfer offer is created and you can again extract the amount, instrument id and deposit account from it.
Differences between Multi-Step Deposits and Withdrawals
Analogously to 1-step transfers, the sender that creates the withdrawal offer, i.e., the treasury party sees aTransferFactory_Transfer exercise node and can extract amount and reason from that.
For Canton Coin, both the creation of the TransferInstruction as well as the acceptance currently charge fees so the amount specified in the transfer is smaller than the holdings change of the treasury party. Once the CIP for CC fee removal is implemented, this distinction goes away. Currently Canton Coin is the only token on Canton Network charging such fees.
Fault Tolerance
Recall the architecture diagram from theintegration-architecture section:
Handling Crashes
Validator nodes are crash-fault tolerant and do not lose data shared on the Ledger API in case of a crash. Thus a restart is sufficient to recover from crashes. Likewise, we assume that the Canton Integration DB is backed by a crash-fault tolerant database (e.g., PostgreSQL or MySQL). For the integration components that you build, we recommend the following strategy to handle crashes and restarts:-
Tx History Ingestion: keep track of the last ingested offset in the Canton Integration DB. On restart, continue from that offset. If none is set, then that means it never ingested any transaction. In that case, start from the beginning of the transaction history, i.e., start from offset
0. For this to work, it is important that you store the ingested offset in the same transaction as you store the ingested data. See the individualintegration-workflowsdescriptions for details. -
Withdrawal Automation: make it stateless, so that it can just restart. This is in line with how we recommend to implement both the
one-step-withdrawal-workflowand themulti-step-withdrawal-workflow. -
Multi-Step Deposit Automation: make it stateless, so that it can just restart. This is in line with how we recommend to implement the
multi-step-deposit-workflow.
Handling RPC Errors
Below we explain our recommendation for handling RPC errors in the integration components you are building. We focus on handling errors from interacting with the Ledger API and the Registry API Servers of the token admins. We do not cover handling errors from accessing DBs or other internal systems, as we assume you have strategies in place for those.- Tx History Ingestion: only reads from the Ledger API. We recommend to retry these reads a bounded number of times on
retryable-errors. Wait at least a few seconds between retries and consider using exponential backoff to avoid overloading the Validator Node. Consider crashing the ingestion component if the bounded number of retries is exceeded to recover from bugs in the in-memory state of the ingestion component.
-
Withdrawal Automation: recall from
one-step-withdrawal-workflowthat the Withdrawal Automation first retrieves extra context from the Registry API Server of the token admin and then prepares, signs, and executes the transaction to submit the transfer for the withdrawal using the/v2/interactive-submission/executeendpoint of the Ledger API. The endpoint is asynchronous and observing its response only means that the transaction has been accepted for processing. You can retrieve the status of the execution via the/v2/commands/completionsendpoint of the Ledger API; or alternatively, by observing the effect of the execution via the Tx History Ingestion component. The latter option is more robust, as it ensures that you observe the effect of the execution in a persistent manner. We recommend that you retry the steps from the start when not observing the successful completion of the withdrawal within the expected time or when encountering a retryable error on the execution itself. You thereby ensure that you prepare the withdrawal transaction using the latest state of the Validator Node and the latest extra context from the Registry API Server. Use a bounded number of retries with at least a few seconds between retries and consider using exponential backoff. Retrying all steps is safe from a consistency perspective because the withdrawal transaction is idempotent, as it archives the UTXOs used to fund the transfer once the transfer is submitted. You nevertheless want to avoid retrying too often, as executing a transaction costs traffic. Stop retrying once the withdrawal has been marked as definitely failed in the Canton Integration DB by the Tx History Ingestion component. A withdrawal is considered definitely failed once its target record timetrecTgtis below the last ingested record time. -
Multi-Step Deposit Automation: the approach is analogous to the one for Withdrawal Automation.
Recall from
multi-step-deposit-workflowthat the Multi-Step Deposit Automation discovers a pending deposit by reading from the Canton Integration DB, then retrieves extra context from the Registry API Server of the token admin and finally prepares, signs, and executes the transaction to accept the transfer offer using the/v2/interactive-submission/executeendpoint of the Ledger API. The endpoint is asynchronous and observing its response only means that the transaction has been accepted for processing. You can retrieve the status of the execution via the/v2/commands/completionsendpoint of the Ledger API; or alternatively, by observing the effect of the execution via the Tx History Ingestion component. The latter option is more robust, as it ensures that you observe the effect of the execution in a persistent manner. We recommend that you retry the steps from the start when not observing the successful completion of the transfer offer acceptance within the expected time or when encountering a retryable error on the execution itself. You thereby ensure that you prepare the transaction to accept the transfer offer using the latest state of the Validator Node and the latest extra context from the Registry API Server. Use a bounded number of retries with at least a few seconds between retries and consider using exponential backoff. Retrying all steps is safe from a consistency perspective because the accept transaction is idempotent, as it archives the transfer offer once it is accepted. You nevertheless want to avoid retrying too often, as executing a transaction costs traffic. You can stop retrying after a bounded number of retries. The sender can reclaim their funds at any point by withdrawing the offer. The Multi-Step Deposit Automation will learn about the withdrawal of the offer via the Tx History Ingestion component, which will mark the transfer offer as withdrawn in the Canton Integration DB.
Retryable errors
For increased robustness and fault tolerance, we recommend to retry by default on all errors and manage an exclude list of non-retryable errors. As a starting opint, we suggest to exclude the following HTTP error codes from retries:- 401 Unauthorized
- 403 Forbidden
- 500 Internal Server Error
- 501 Not Implemented
Reading from Canton Coin Scan
As explained inmvp-for-cc, the Registry API Server of the token admin for Canton Coin is provided by the Canton Coin Scan services. They are run as part of every SV node.
For convenience, every Validator Node provides a Scan proxy service to read from the Scan instances run by SVs with Byzantine fault tolerance. The Scan proxy service also implements the Token Standard Registry API for Canton Coin.
We recommend to use Scan proxy service of the Exchange Validator Node to retrieve the extra context for Canton Coin transfers.
If that is not possible, then you can read from a random Canton Coin Scan instance for the purpose of retrieving extra context for Canton Coin transfers. The on-ledger validation of the transfers ensures that you do not need to trust the Scan instance for correctness. Ensure that you read from a different Scan instance on every retry to avoid being affected by a faulty Scan instance for too long.
Validator Node Operations
Reward Minting and Traffic Funding
As explained intokenomics-and-rewards, your validator node will need traffic to submit the transactions to execute withdrawals or accept multi-step deposits. As also explained in that section, the network provides rewards that can be used to fund traffic.
Note also that every validator node has an associated validator operator party that represents that validator node’s administrator (docs). The validator node automatically mints rewards for that party. It can further be configured to automatically purchase traffic using that party’s CC balance, which includes the minted rewards.
We thus recommend the following setup as a starting point to mint rewards and automatically fund traffic:
- Use the validator operator party as your featured
exchangeParty. Followexchange-party-setupto get it featured. treasury-party-setupto create atreasuryPartywith a transfer preapproval managed by yourexchangeParty.- Setup automatic traffic purchases in the validator app.
- Optional: setup auto-sweep from the
exchangPartyto yourtreasuryPartyto limit the funds managed directly by the validator node.
targetThroughput to 2kB/s and minTopupInterval to 1 minute, which should be sufficient to execute about one withdrawal or deposit acceptance every 10 seconds. Please test this with your expected traffic pattern and adjust as needed. See this FAQ to measure the traffic spent on an individual transaction.
Setup Exchange Parties
Setup the featured exchange party
As explained above inreward-minting-and-traffic-funding, we recommend to use the validator operator party as your featured exchangeParty. This party is automatically created when you deploy your validator node. Thus the only setup step is to get it featured by the SVs:
On DevNet, you can self-feature your validator operator party as follows:
-
Log into the wallet UI for the validator user, which presents itself as in this screenshot:
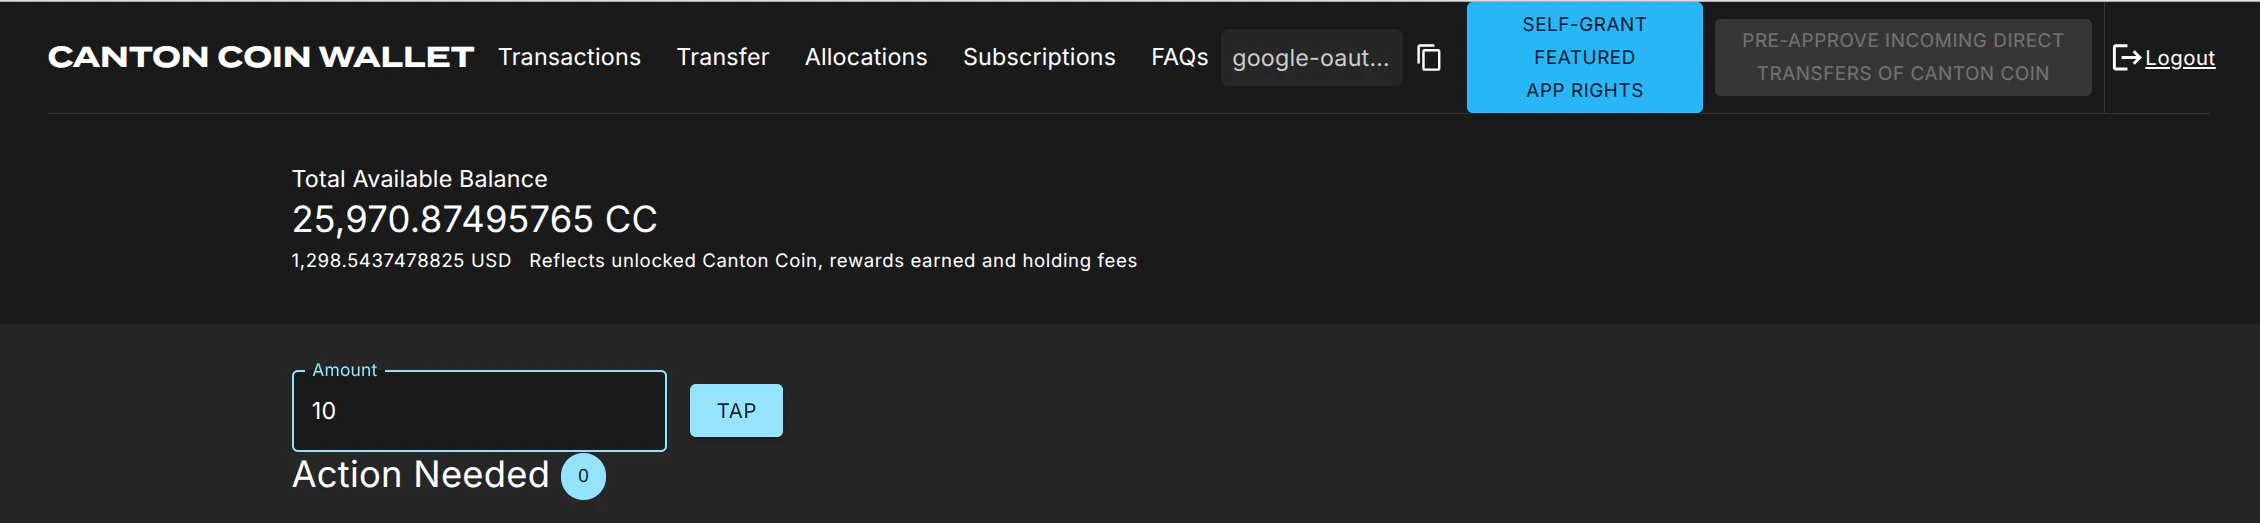
- Tap 20 $ of CC to ensure that your validator operator party has enough funds to purchase traffic.
- Click on the “Self-grant featured app rights” button.
-
The button is replaced with a star ⭐ icon once the
FeaturedAppRightcontract has been created for your validator operator party. This may take about 10 seconds.
- Log into the wallet UI for the validator user on your MainNet validator node.
- Copy the party-id of your validator operator party using the copy button right of the abbreviated
"google-oaut.."party name in the screenshot above. - Apply for featured application status using this link: https://sync.global/featured-app-request/
FeaturedAppRight contract issued by the DSO party for its validator operator party.
On TestNet there is currently no official process, but you should be able to use the same procedure as the one for MainNet.
Setup the treasury party
Setup thetreasuryParty as follows with a transfer preapproval managed by your exchangeParty:
-
Create the
treasuryPartyusing the wallet SDK tocreate-an-external-partywith a key managed in a system of your choice -
Copy the party id of your
exchangePartyfrom the Splice Wallet UI as explained above, or retrieve it by calling/v0/validator-useron the Validator API. -
Call
/v2/commands/submit-and-waiton the Ledger API to create a#splice-wallet:Splice.Wallet.TransferPreapproval:TransferPreapprovalProposal(code) directly with theproviderset to yourexchangeParty. Note that setting up this transfer preapproval requires theexchangePartyto pay a small fee of about 0.25 $ worth of CC. The funds for this fee usually come from the validator liveness rewards that a validator node starts minting about 30 minutes after it is created. On DevNet or LocalNet, you don’t have to wait that long: just “Tap” the required funds from the built-in faucet.
Testing the party setup
You can test the party setup on LocalNet or DevNet as follows:- Setup your
exchangePartyandtreasuryPartyas explained above. - Setup an additional
testPartyrepresenting a customer. - Transfer some CC from the
testPartyto thetreasuryPartyto simulate a deposit. - Observe the successful deposit by listing holdings of the
treasuryParty. - Observe about 30’ later in the Splice Wallet UI of your validator operator user that the
exchangePartyminted app rewards for this deposit. It takes 30’, as activity recording and rewards minting happen in different phases of a minting round.
Setup Ledger API Users
Clients need to authenticate as a Ledger API user to access the Ledger API of your Exchange Validator Node. You can manage Ledger API users and their rights using the/v2/users/... endpoints of the Ledger API.
You will need to authenticate as an existing user that has participant_admin rights to create additional users and grant rights. One option is to authenticate as the ledger-api-user that you configured when setting up authentication for your validator node. Another option is to log-in to your Splice Wallet UI for the validator operatory party and use the JWT token used by the UI.
We recommend that you setup one user per service that needs to access the Ledger API. This way you can easily manage permissions and access rights for each service independently. The rights required by the integration components are as follows:
| Component | Required Rights | Purpose |
|---|---|---|
| Tx History Ingestion | canReadAs(treasuryParty) | Read transactions and contracts for the treasuryParty. |
| Withdrawal Automation | canActAs(treasuryParty) | Prepare and execute transactions on behalf of the treasuryParty. |
| Multi-Step Deposit Automation | canActAs(treasuryParty) | Prepare and execute transactions on behalf of the treasuryParty. |
Automated exchange parties setup for exchange-integration-testing | participant_admin and canActAs(treasuryParty) | Create parties and use the treasuryParty to create its TransferPreapprovalProposal. Hint: grant canActAs(treasuryParty) to the user doing the setup after allocating the treasuryParty. |
.dar File Management
.dar files define the Daml workflows used by the token admins for their tokens. They must be uploaded to your Exchange Validator Node to be able to process withdrawals and deposits for those tokens.
The .dar files for Canton Coin are managed by the Validator Node itself. The .dar files for other tokens need to be uploaded by you using the /v2/packages endpoint of the Ledger API. See this how-to guide for more information.
Monitoring
See the Splice documentation for guidance on how to monitor your validator node. Note in particular that it includes Grafana dashboards for monitoring the traffic usage, balances of local parties (e.g., theexchangeParty), and many other metrics.
Rolling out Major Splice Upgrades
For major protocol changes, the global sychronizer undergoes a Major Upgrade Procedure. The schedule for these upgrades is published by the Super Validators and also announced in the#validator-operations slack channel.
As part of this procedure, the old synchronizer is paused, all validator operators create an export of the state of their validator, and deploy a new validator connected to the new synchronizer and import their state again. For a more detailed overview, refer to the Splice docs.
The procedure requires some experience to get it right, so it is highly recommended to run nodes on DevNet and TestNet so you can practice the procedure before you encounter it on MainNet.
From an integration perspective, there are a few things to keep in mind:
- A major upgrade only preserves the active contracts but not the update history. In particular, you will not be able to get transactions from before the major upgrade on the update service on the Ledger API of the newly deployed validator node.
- Offsets on the upgraded validator node start from
0again. - The update history will include special import transactions for the contracts imported from the old synchronizer. They all have record time
0001-01-01T00:00:00.000000Z, and represent the creation of the imported contracts.
Runbook
We recommend to roll-out the upgrade as follows:- Wait for the synchronizer to be paused and your node to have written the migration dump as described in the Splice docs.
-
Open the migration dump and extract the
acs_timestampfrom it, e.g., usingjq .acs_timestamp < /domain-upgrade-dump/domain_migration_dump.json. This is the timestamp at which the synchronizer was paused. -
Wait for your Tx History Ingestion to have caught up to record time
acs_timestampor higher. Note that you must consume offset checkpoints to guarantee that your Tx History Ingestion advances pastacs_timestamp. - Stop your Tx History Ingestion component.
- Upgrade your validator and connect it to the new synchronizer following the Splice docs.
-
Follow the shortened version below of the procedure for restoring a validator node from a backup to determine the offset from which to restart your Tx History Ingestion:
-
Retrieve the
synchronizerIdof the last ingested transaction from the Canton Integration DB. -
Log into the Canton Console of your validator node and query the offset
offRecoveryassigned to the ACS import transactions at time0001-01-01T00:00:00.000000ZusingAlternatively, you can usegrpcurlto query the offsetoffRecoveryfrom the command line as shown in the example below:If you use authentication for the Canton Admin gRPC API, then you need to add the appropriate authentication flags to thegrpcurlcommand above. -
Configure the Tx History Ingestion component to start ingesting from offset
offRecovery. - Restart the Tx History Ingestion component.
-
Retrieve the
Backup and Restore
Recall that theintegration-architecture, shown in the diagram below, relies on two stateful components: the Exchange Validator Node and the Canton Integration DB. We recommend backing them up regularly, so that you can restore them in case of a disaster.
Restoring these components from a backup can lead to data loss, which needs to be handled carefully in the integration components you are building. See the sections below for guidance on how to do so.
Backing up the Exchange Validator Node
Follow the Splice documentation on how to backup a validator node.Backing up the Canton Integration DB
As explained in thecanton-integration-components section of the integration-architecture, the Canton Integration DB is more of a logical component. Whether you implement it as a separate DB or as part of the DBs backing your Exchange Internal Systems is up to you.
Follow your internal guidance and best practices on what DB system to use and how to back it up.
Restoring the Exchange Validator Node from a Backup
Follow the Splice documentation on how to restore a validator node from a backup to restore the Exchange Validator Node from a backup that is less than 30 days old. The node will resubscribe to transaction data from the synchronizer and recover all committed transactions and the corresponding changes to the set of active contracts (i.e. UTXOs). However validator-node local data written after the backup will be lost, as described on the Canton documentation page. In the context of the recommendedintegration-workflows, this data loss affects:
- .dar file uploads: handle this by repeating the upload of all
.darfiles that were uploaded after the backup. This should be a rare event, as token onboarding is infrequent. - Ledger API offsets: offsets assigned to transactions received from the Ledger API may change. This only affects the Tx History Ingestion component of the integration.
Runbook
Follow these steps to restore the Exchange Validator Node from a backup:- Stop Tx History Ingestion before restoring the Exchange Validator Node from a backup.
-
Retrieve the record time
tRecoveryandsynchronizerIdof the last ingested transaction from the Canton Integration DB. - Restore the Exchange Validator Node from the backup.
-
Reupload all
.darfiles that were uploaded after the backup. -
Log into the Canton Console of your validator node and query the offset
offRecoveryassigned totRecoveryusingAlternatively, you can usegrpcurlto query the offsetoffRecoveryfrom the command line as shown in the example below:If you use authentication for the Canton Admin gRPC API, then you need to add the appropriate authentication flags to thegrpcurlcommand above. -
Configure the Tx History Ingestion component to start ingesting from offset
offRecovery. - Restart the Tx History Ingestion component.
These steps assume that record times assigned to transactions are unique, which is the case unless you are using participant-local operations that modify the transaction history. These are ACS imports, party migrations, party replication, or repair commands. Multi-hosting a party from the start does not lead to non-unique record times.If your are using participant-local operations that modify the transaction history, then you we recommend adjusting Step 5 as follows to deal with the rare case of a partial ingestion of transactions with the same record time:
- Lookup the recovery offset
offRecoveryas oftRecovery - 1 microsecond.- Start ingesting from offset
offRecovery, but filter out all transactions whose update-id is already known in the Canton Integration DB because they have been ingested before Tx History Ingestion was stopped in Step 1.
Restoring the Canton Integration DB from a Backup
Follow your internal guidance and best practices on how to restore the Canton Integration DB from a backup. From a data consistency perspective, all writes to the Canton Integration DB by Tx History Ingestion will be recovered without data loss from the transactions stored on the Exchange Validator Node. Likewise, the write in Step 3 of theone-step-withdrawal-workflow to mark a withdrawal as failed due to the lack of a CC transfer-preapproval is safe to redo, as it is idempotent.
Thus the only data loss that you need to handle is the loss of data written by your Exchange Internal Systems to the Canton Integration DB to request the execution of a withdrawal. This data consists in particular of the withdrawal-id, the UTXO reservation state, and the reservation of user funds for the withdrawal. See Step 2 in the one-step-withdrawal-workflow and Step 2 in the multi-step-withdrawal-workflow for details.
The problem to avoid is for the user to initiate another withdrawal of the funds whose withdrawal might be in-flight on Canton. You can do so as follows:
- Disable initiating withdrawals of CN tokens in your Exchange Internal Systems and stop the Withdrawal Automation component.
- Restore the Canton Integration DB from the backup.
- Wait until Tx History Ingestion has ingested a record time
tSafethat is larger than the largest target record timetrecTgtof all in-flight withdrawals. Assuming you use a constantttlto compute thetrecTgtof a withdrawal, you can estimatetSafeasnow + ttl. - Enable withdrawal creation in your Exchange Internal Systems and start the Withdrawal Automation component. The integration is operational again.
Integration Testing
Test Node Setup
When testing on your laptop or in CI, we recommend using Splice’s LocalNet, which is a Docker-Compose based local deployment of a Global Synchronizer and Canton Coin. Automate the exchange parties setup as part of your test setup, so that you can start from a clean state for each test run while reusing the same LocalNet. Thereby achieving test isolation without the overhead of starting and stopping LocalNet for each test run. Alternatively you can consider setting up a DevNet validator node using either Docker-Compose or k8s as documented in Splice and using that for testing.Test Scenarios
Apart from testing functional correctness, we recommend testing for robustness and fault tolerance of your integration code. In particular, we recommend testing for the following scenarios:- Crash-fault tolerance, in particular:
- successfully continuing Tx History Ingestion after a crash
- successfully continuing Withdrawal Automation after a crash
- handling the case that two withdrawal transfers are initiated for the same withdrawal request: test that only one of them succeeds because they spend the same UTXOs, which is detected by Canton
- successfully continuing of the Multi-Step Deposit Automation after a crash, and handling the case that the deposit offer was accepted while the Multi-Step Deposit Automation was down
- Retrying on RPC errors, in particular:
- retries that succeed after a few attempts
- retries that do not succeed within the bounded number of retries, and how the integration code marks the withdrawal or deposit offer as failed.
- Does your integration code deal well with high rates of deposits and withdrawals. We recommend to determine target throughput rates for deposits and withdrawals and test that your integration code can handle those rates without falling behind. In particular, test:
- Can Tx History Ingestion keep up with the rate of deposits and withdrawals.
- Can
utxo-managementdeal with the case that there are no UTXOs available to fund a withdrawal. - Does your integration code rate limit executing transactions on the Validator Node to avoid running out of traffic with your automatic traffic configuration. See the
validator-node-monitoringsection for more information. - Does your
utxo-managementcode handle the case where there are only small UTXOs available, and they first have to be merged before they can be used to fund a withdrawal. - Does your integration code properly rate limit bursts of deposits and withdrawals above the target throughput rate.
- Does your integration code gracefully handle a crash when under full load.
- Does your integration code recover from data loss due to
validator_backup_restorerestore-canton-integration-db
- Does your integration code handle
hard-synchronizer-migration. Note that simulating a major Splice upgrade is not easily possible with LocalNet. We thus recommend to the check the schedule for major Splice upgrades and ensure that you are ready to handle the first one on DevNet.
Integration Extensions
This page describes the following additional features that you can consider adding to your integration, beyond the MVP described in theexchange-integration-overview section:
Optimizing App Rewards
The MVP for all CN tokens described in theexchange-integration-overview section comes with the limitation that application rewards are only earned on deposits of CC, but not on deposits of other CN tokens. We recommend to lift this limitation and to improve the profitability of the integration using Canton Coin’s featured application activity marker mechanism. It allows tagging transactions with a featured application activity marker and earn application rewards for them.
The idea is to tag both the initatiation of withdrawals and the acceptance of deposit offers with a featured application activity marker to attribute the transaction to the exchangeParty. Tagging these transactions is compliant with the guidance given in the Splice documentation, as they correspond to transfers and create value for the network.
In order for the treasuryParty to create featured application activity markers in the name of the exchangeParty, a delegation contract is required. A suitable delegation template called DelegateProxy is part of the splice-util-featured-app-proxies package. We recommend to use this package and template as explained in the sections below.
Earning App Rewards for Withdrawals
The following steps describe how to adjust the Withdrawal Automation to tag withdrawal transfers with a featured application activity marker.-
Download the most recent version of the
splice-util-featured-app-proxies.darfile from the Splice repository’s checked-in .dars. Note that at the time of writing, there was no official release of the Splice .dars that included this package, which is why we recommend downloading the .dar directly from the repository. -
Upload that
splice-util-featured-app-proxies.darfile to your Exchange Validator Node. -
Change the Ledger API user setup such that the
- the user used by Withdrawal Automation also has the
readAs(exchangeParty)right - the user that performs the exchange parties setup also has the
canActAs(exchangeParty)right.
- the user used by Withdrawal Automation also has the
-
Add a step to the treasury party setup to also create a
DelegateProxycontract withprovider = exchangePartyanddelegate = treasuryParty. Use the/v2/commands/submit-and-waitendpoint submit thecreatecommand for theDelegateProxytemplate. -
Change the initialization code of the Withdrawal Automation to:
- query the active contracts of the
exchangePartyfor theDelegateProxycontract created in the previous step and store its contract ID inproxyCid. - query the active contracts of the
exchangePartyfor theFeaturedAppRightcontract and store its contract ID infeaturedAppRightCidand its create-event-blob infeaturedAppRightEventBlob.
- query the active contracts of the
-
Change the Withdrawal Automation code that initiates a withdrawal transfer to call the
DelegateProxy_TransferFactory_Transferchoice instead of theTransferFactory_Transferchoice, as shown in this test case. The call to the choice takes theproxyCidand thefeaturedAppRightCidas parameters alongside the actual transfer parameters. Pass in thefeaturedAppRightEventBlobas an additional disclosed contract.
TransferFactory_Transfer choice that is called by the DelegateProxy_TransferFactory_Transfer choice.
Earning App Rewards for Deposits
Steps 1 to 5 are analogous to the steps described in thewithdrawal-app-rewards section above.
In Step 6, change the Deposit Automation code that accepts a deposit offer to call the DelegateProxy_TransferInstruction_Accept choice instead of the TransferInstruction_Accept choice, as shown in this test case.
Sharing App Rewards with your Customers
The featured app marker API allows splitting the activity record across multiple beneficiaries. Each of them then gets credited for a fraction of the activity. You can use this feature to share some of the application rewards with your customers to incentivize them to use your exchange. To do so, you need to adjust the code changes described in the sections above to pass in multiple beneficiaries to the respective choices, as called out in this test case.Sharding the Treasury
Sharding your treasury over multiple treasury parties may be interesting to reduce the risk of compromise of a singletreasuryParty’s private key. Using multiple treasury parties also provides operational flexibility with respect to which validator nodes host what party. This can be useful for load balancing or to incrementally change your party hosting setup.
You can shard your treasury over multiple parties as follows:
- Setup multiple treasury parties instead of using a single
treasuryParty. Use the setup described in thetreasury-party-setupsection for each of them. - Run one instance of Tx History Ingestion, Withdrawal Automation, and Multi-Step Deposit Automation for each treasury party.
- Share the Canton Integration DB across all instances, but adjust the schema such that UTXOs and pending multi-step transfers are tracked per treasury party.
- Change your Exchange Internal Systems such that they select the treasury party as well as the
HoldingUTXOs to use for funding a withdrawal. For large withdrawals that surpass the funds available to a single treasury party, you can either rebalance the funds across multiple treasury parties or split the withdrawal into multiple smaller ones.
Multi-Hosting the Treasury Party
The documentation on setting up the exchange party describes how to setup a party with a single confirming node. This can be sufficient but the confirming nodes for the party are essential to keep your party secure and compromise of them could lead to loss of funds. Refer to the trust model trust model for more details. To guard against compromise of the confirming nodes, you can setup yourtreasuryParty with multiple confirming nodes and a threshold N > 1. As long as less than N nodes are compromised, your party is still secured. Common setups are:
- Two confirming nodes with a threshold of 2. This provides security against a single node being compromised. However, if one of the two nodes is down, transactions for the party will fail.
- Three confirming nodes with a threshold of 2. This extends the previous setup to also provide availability in case one of the nodes goes down or gets compromised as the other two nodes are still functional.
Party Setup
https://github.com/canton-network/wallet-gateway/issues/272 Update this when wallet SDK support is available
As part of the initial treasury party setup, you generate the PartyToParticipant topology transaction which lists both the confirming nodes and the confirmation threshold. To host a party on multiple nodes, you need to include all confirming nodes in the PartyToParticipant mapping when you setup the party initially. Note that at this point, the wallet SDK library does not yet support this so you must go directly through the Canton APIs. This is expected to change soon.
Until then, the easiest way to do so at the moment is through the Canton console. You can find a full reference for all required steps in the integration test. Note in particular that you must sign the PartyToParticipant mapping not just by your party’s key but also by all confirming participants. This is accomplished through the participant2.topology.transactions.authorize step in the test.
.dar File Management
Any .dar file that you upload, both as part of the initial setup but also whenever you upload newer versions to upgrade an existing package, must be uploaded to all validator nodes hosting your party.Reading Data and Submitting Transactions
Both nodes serve all transactions for thetreasuryParty and can thus be used in principle to read them. However, offsets are not comparable across nodes so it is recommended that to run Tx History Ingestion against the same node under normal operations. If you do need to switch nodes, you can do so following the same procedure used for restoring a validator from a backup to resynchronize Tx History Ingestion against the offsets of the new node.
Preparation and execution of transactions can also be done against any of the confirming nodes of the party. However, Command Deduplication is only performed by the executing node so if you submit across nodes you cannot rely on it. It is therefore recommend _not to rely on command deduplication at all in favor of UTXO and max record time based deuplication.
Link to recommended deduplication strategy https://github.com/canton-network/wallet-gateway/issues/423
Changing the set of Confirming Nodes
There are some limitations on changing the set of confirming nodes: Removing confirming nodes is possible by submitting a newPartyToParticipant topology transaction. However, this can leave the nodes that you remove in a broken state so this should be limited to cases where that node got compromised or is no longer needed for other purposes.
Adding new confirming nodes is not currently possible. If this is required, you need to instead:
- Setup a new treasury party with the desired set of confirming nodes.
- Either transfer all funds from the existing treasury party to the new one and switch only to the new treasury party or rely on
treasury-shardingto use both treasury parties until you are ready to phase out the old party.
PartyToParticipant topology transaction with the updated threshold.
Future versions of Canton will allow changing the confirming nodes without the need for setting up a new party.
Using a KMS for Validator Node Keys
See the Splice docs for how to setup you validator node with keys stored in a KMS. Consider doing so as an additional security hardening measure to protect the keys of the confirming node(s)_ of yourtreasuryParty.